Target is a well-known online marketplace that presents a wide array of microphones to cater to diverse audio needs. Whether you’re into creating content or enjoying high-quality sound, it has a selection for every audio enthusiast. The options include USB Condenser Microphones for clear studio-like audio and Wired Unidirectional Microphones for focused sound capture.
Each type has unique features to ensure users can find the perfect fit for their specific needs. Moreover, mini microphones have proven to be a flexible solution for podcasting or recording on the move. If you want to learn how to use a mini microphone from Target, keep reading to discover improved audio options.
Mini Microphones and Their Use Cases
Mini microphones are also referred to as compact microphones. They serve as portable and flexible audio devices crafted to capture clear and top-notch sound in diverse settings. Due to their small size, they prove ideal for use on the go and find utility in a wide array of situations. These small microphones, with their unique features, address a wide range of purposes.
Users can utilize their capabilities, ranging from creating podcasts and content to participating in live events and recordings. Understanding the specific qualities of each type enables users to make the most of mini microphones in particular situations.
Use Cases of Mini Microphones
- Podcasting and Vlogging: Mini microphones are excellent tools for podcasters and vloggers seeking a portable solution for recording interviews, discussions, or personal reflections. Their small design easily integrates into recording setups that offer a straightforward way to improve audio quality.
- Mobile Recording: Individuals needing to record audio using smartphones or tablets can benefit from mini microphones. Mobile devices usually have connectors or ports to enable high-quality audio recordings.
- Lectures and Presentations: They are advantageous for educators, public speakers, or presenters aiming to amplify their voices during lectures or presentations. The seamless portability enables integration with different presentation tools for audible and clear communication.
- Music Recording: Musicians and songwriters can benefit from mini microphones for quick and easy recording of musical ideas. Users can get a compact and efficient solution for musicians on the move to capture acoustic performances or record vocals.
- Gaming and Live Streaming: Gamers and content creators involved in live streaming can enhance their audio quality by using mini microphones. Users can capture clear and crisp commentary during gaming sessions and add a professional touch to the streaming experience.
A Complete Guide to Use Mini Microphone from Target
As we start exploring how to use the mini microphone from Target, let’s first take a look at what comes inside the box during the unboxing experience. This initial step helps us become familiar with the essential components that accompany the microphone. Whether you’ve recently gotten the mini microphone or are thinking about getting one, understanding what’s included in the package lays the groundwork.
- Unboxing and Contents of Mini Microphones from Target
When opening the box of the mini microphone, users can expect to find a collection of essential components. Typically, the package should include the mini microphone itself, featuring its sleek and compact design. Alongside the microphone, users will discover vital cables and adapters designed to ensure smooth connections with various devices. These cables might include USB or other connectors for flexibility in usage.
Additionally, a user manual is included to provide guidance on setting up and using the microphone for users of all levels of expertise. Depending on the type of microphone, there could be extra accessories or specific features for certain models.
Example of Mini Microphone Available on Target
Saramonic SmartMic UC Mini is an extremely small omnidirectional condenser microphone that connects directly to the USB-C port of your Android, iPhone, tablet, or computer. You will discover the following elegant collection of essential components while opening the mic box from Target.
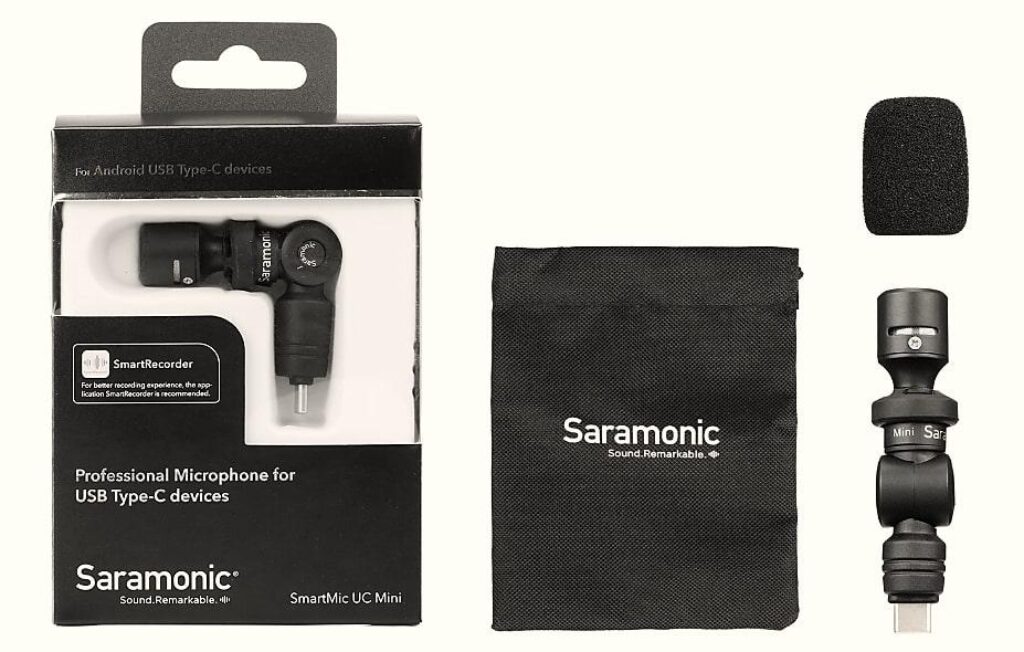
- 9 Grams Mini Microphone
- Fleece
- Battery
- Drawstring Protective Travel Pouch
- Physical Setup of Mini Microphones from Target
Setting up your mini microphone physically means linking it to your device using different approaches. The process is clear-cut to connect on your Android, iPhone, tablet, or computer if you possess a USB-C microphone. When you are working with a computer, connecting a USB-C microphone is as simple as plugging it into an available USB port.
Furthermore, an adapter is required in the case of a microphone having a 3.5mm jack with only the support of USB-C. This smooth transition between various connection methods enables you to use your microphone with different devices, providing versatility and ease in your setup.
Connect a Mini Mic with a Smartphone with USB-C or 3.5mm Jack
The utilization of a microphone equipped with a USB-C or 3.5mm jack output is a straightforward process. Simply insert it into your smartphone, and it will be instantly recognized as the default audio device. Then, it surpasses the internal microphone and provides an immediate enhancement in audio quality.
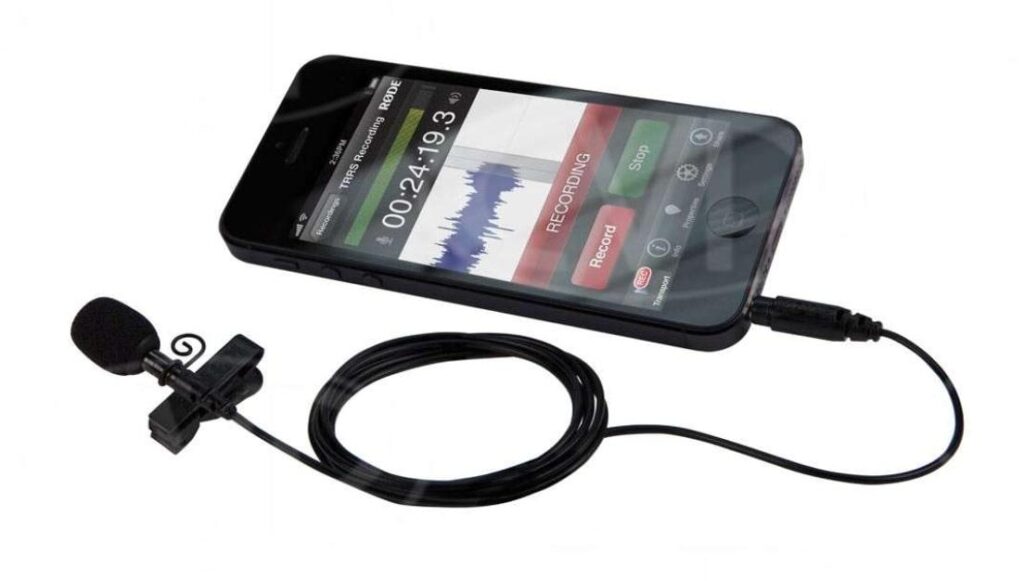
Connecting a 3.55mm Microphone with USB-C
The AI-Micro offers an excellent solution for linking 3.5mm microphones to smartphones. Additionally, the SC4 adapter facilitates the conversion of TRS to TRRS connections, making it compatible with smartphones. If you possess a microphone with a 3.5mm connector, these tools enable seamless integration with USB-C or lightning smartphones.

Connecting Mini Mics with Computer
- To connect a primary computer microphone, first, identify the jack type, either 1/8” TRS or USB, on the microphone. Additionally, for USB, plug it into an available USB port.
- For XLR mics, use an adapter cable or USB converter box. However, for optimal quality, you need to have a mixing board with a USB output. For quarter-inch jacks, get a converter cable to connect the microphone to the computer.
- You can even use the Bluetooth connection to connect your wireless mini mic to your computer.
- Power Requirements of Mini Microphones from Target
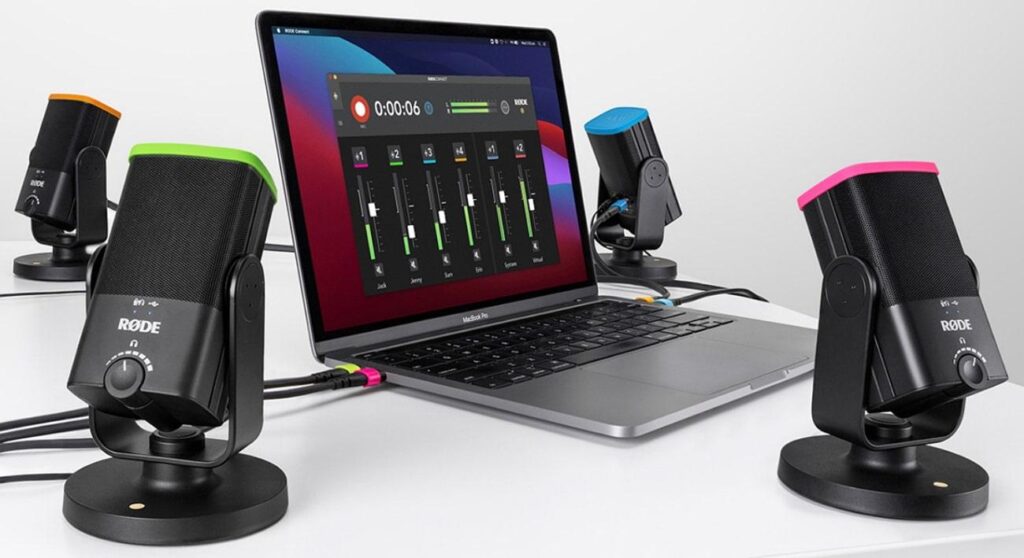
It’s crucial to know how your microphone gets its power to work smoothly. Some mics use batteries to make them portable but need batteries from time to time. Others need charging regularly, which is helpful with rechargeable options. You should think about what you prefer and how you plan to use it when choosing a microphone.
Plug and Play Microphones
Plug-and-play mics get power directly from the device they’re connected to, so no extra power source is required. The Saramonic SmartMic UC Mini is a super-compact omnidirectional condenser microphone. Users can effortlessly use the mic with a simple approach, requiring no batteries or charging. It is specifically designed to directly connect to the USB-C port of your Android device, smartphone, tablet, or computer.
Wireless Microphones
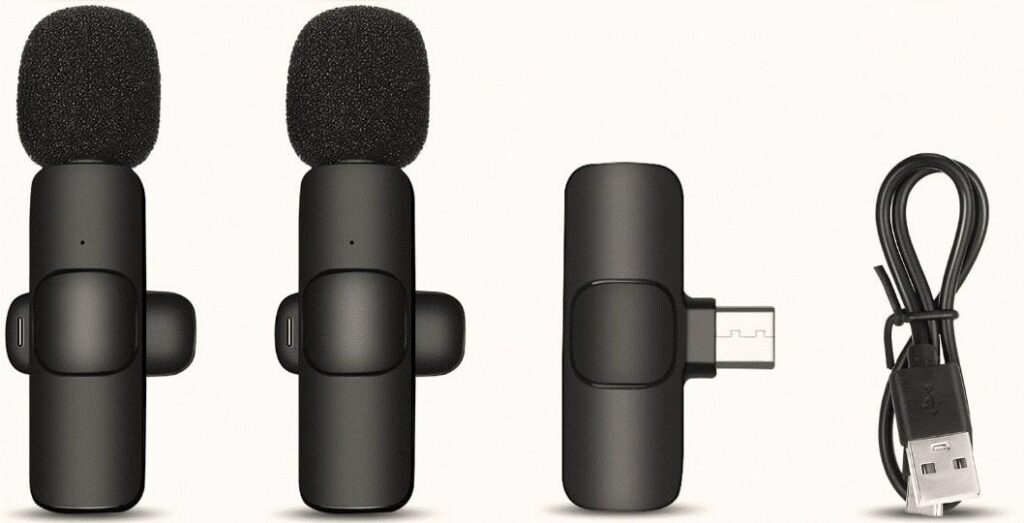
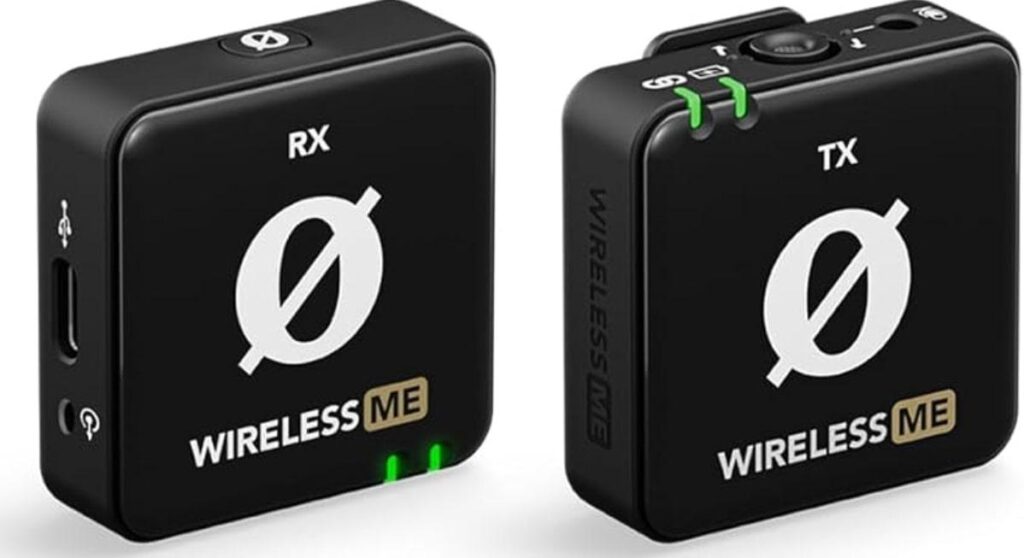
Wireless microphones offer the convenience of rechargeable options to enhance the sound quality of videos. The Wireless Me is an ultra-compact wireless microphone with unique clip-and-go versatility. It features an inbuilt li-po battery that is easily rechargeable via USB for a convenient and efficient power replacement. Users can experience extended usage with a remarkable battery life of up to 7 hours to ensure prolonged wireless microphone functionality for various applications.
- Device Configuration of Mini Microphones from Target
Establishing a seamless connection is essential for optimal performance, whether you’re using a USB, XLR, or Bluetooth mini microphone. Let’s explore the step-by-step process of linking your microphone to the device for an efficient system configuration.
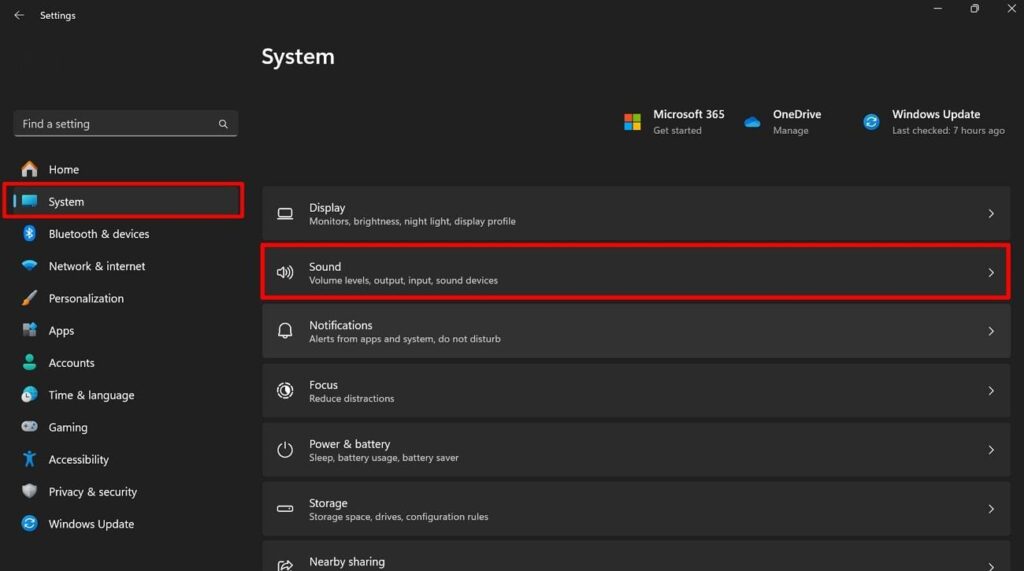
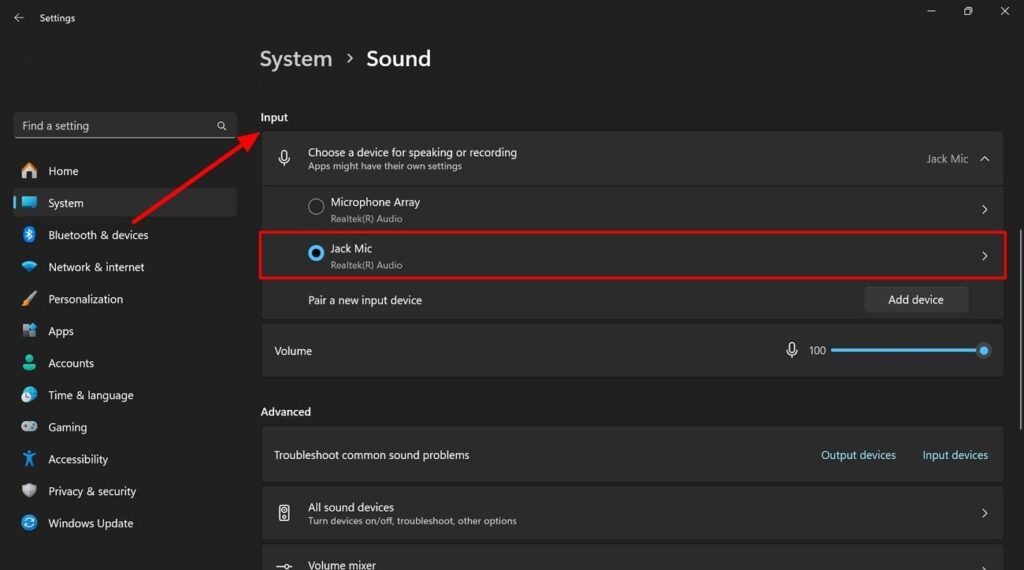
Step 1: First, connect your microphone to a suitable port on your computer. Now, head to the Start Menu by selecting the “Windows” icon and click on “Settings” to access the settings menu. Next, tap on “System” from the left sidebar and proceed with hitting the “Sound” option.
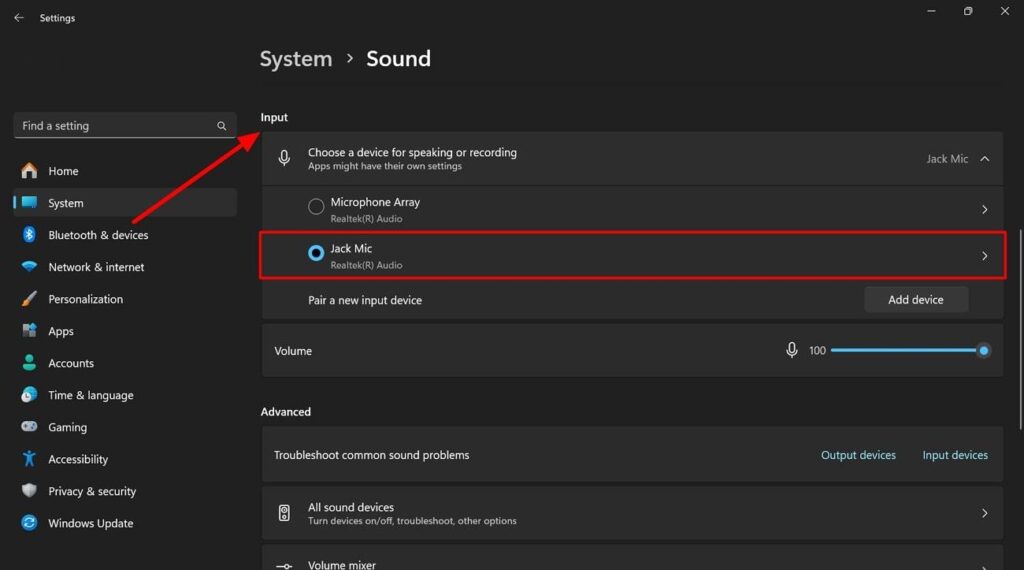
Step 2: In the next, you will be directed to a new screen. Now, navigate toward the “Input” section and choose the mic you’ve connected to your system.
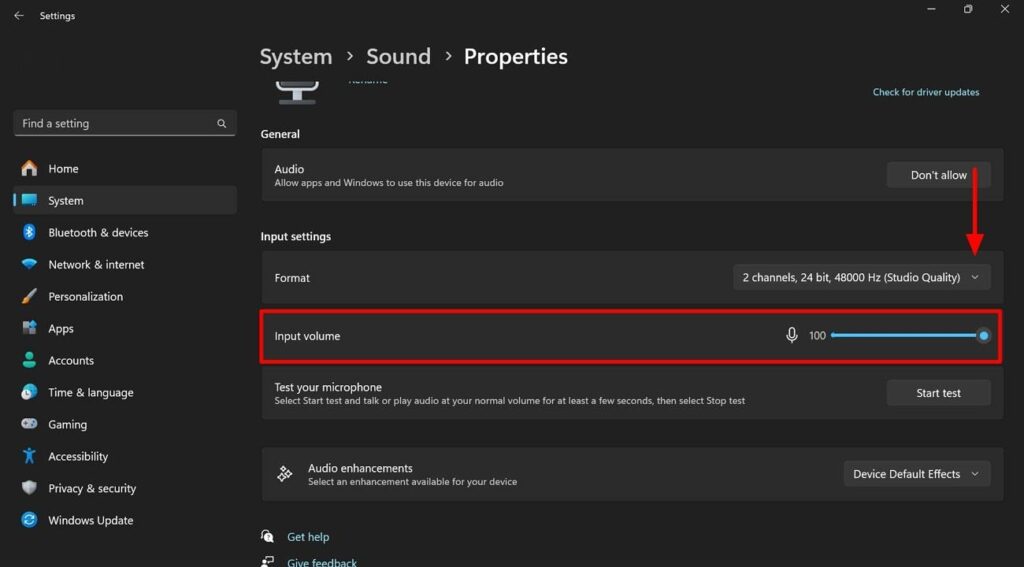
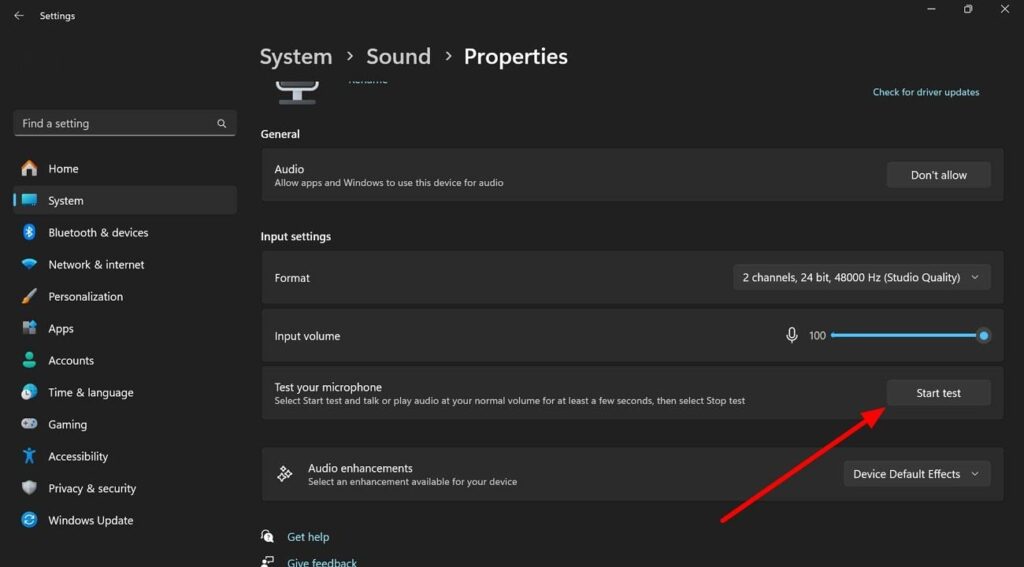
Step 3: After selecting the mic, opt for the properties of the sound. In the “Input Settings” section, customize the setup by clicking on “Format.” Furthermore, you can tap on “Input Volume” to increase or decrease the sound as per required.
- Testing the Mini Microphones from Target
Before testing the microphone using different methods on smartphones and PCs, you should ensure the correct setup of a microphone with the device. Follow the earlier steps to connect and set up your microphone for the best performance. Once done, we can move on to checking how the microphone works in various applications and situations on both smart devices and computers.
Steps of Testing Mini Mic on Smartphone
First, make a successful connection between the smartphone and the mini mic. Afterward, access the “Voice Recorder” application on your smartphone. Now, initiate a recording and speak into the microphone while doing so. Afterward, review the recorded message by playing it back to assess the sound quality.
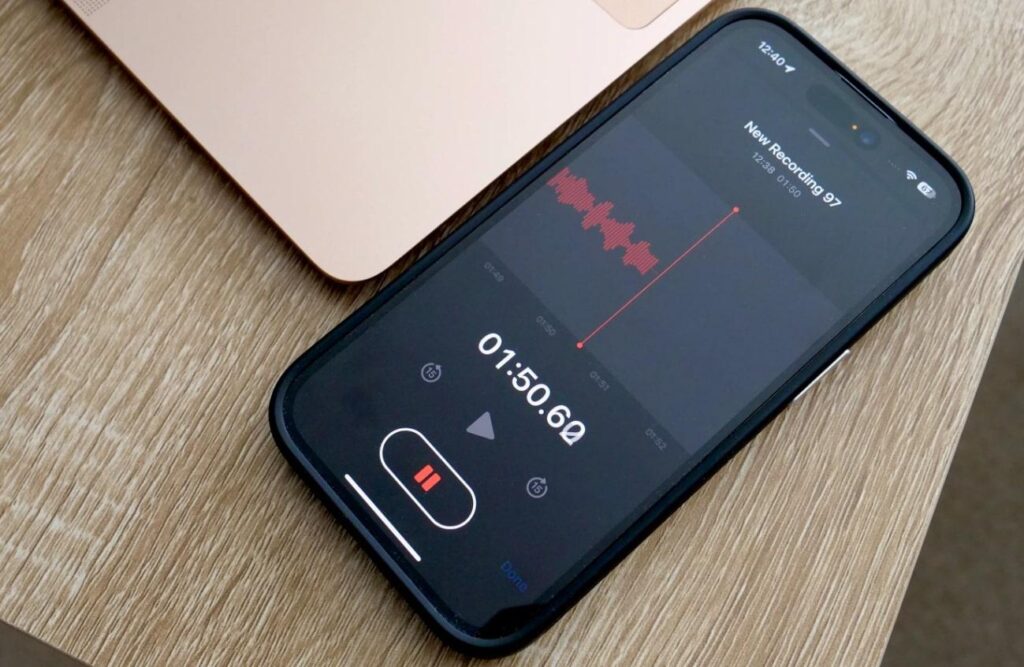
Steps of Testing Mini Mic on PC
Step 1: Begin the process by clicking on the “Windows” icon, then tap “Settings” to open the Windows settings. After that, choose the “Sound” option from the system settings and select the microphone you want to test.
Step 2: Within the sound properties, you’ll find different options under the “Input Settings.” In the “Test Your Microphone” option, hit the “Start test” button to check the sound quality by playing any sound for recording.
- Usage Tips of Mini Microphones from Target
Mini microphones, being small yet powerful, play a crucial role in different audio recording situations. They are helpful for tasks like content creation and on-the-go recording by offering convenience without sacrificing performance. Whether you’re a vlogger or musician who values great sound, understanding the tips for using mini microphones will surely improve your audio experiences. Let’s uncover their potential and learn how to get the most out of these compact audio devices:
- First, you should keep the microphone at an ideal distance from your mouth, usually between 6 to 12 inches, for clear and balanced audio without distortion.
- You should select a quiet recording environment to minimize noise. Close windows and doors and be aware of appliances or external disturbances.
- When recording outdoors, use a windscreen or foam cover to shield the microphone from wind interference and prevent unwanted noise caused by gusts.
- Users should adjust the microphone’s position for effective sound capture, whether it is omnidirectional or unidirectional, by experimenting with angles to find the best placement.
- You need to keep an eye on the microphone’s input levels to avoid distorted or clipped audio and adjust levels as required for a balanced recording.
- If your microphone uses batteries, regularly check and replace them to prevent sudden power loss during recordings.
- Store small microphones in a protective case when not in use and handle them with care to avoid damage to delicate components.
- Lastly, conduct a brief test recording before important sessions to ensure everything is set up correctly and the microphone is working as expected.
- Troubleshooting Mini Microphones from Target
The tiny audio tool, like any electronic device, might face occasional problems. Whether it’s about connection or unexpected hurdles, it is crucial to know how to solve common issues for a better and more dependable experience. Let’s explore the troubleshooting methods to handle any problems with your mini microphone.
- Microphone Not Detected
It often happens that your computer fails to recognize the attached microphone. It can be due to faulty connections or outdated drivers.
Fixes
- For this issue, you should ensure the microphone is correctly connected to the designated port. If it’s a USB microphone, consider trying a different USB port to rule out any connection issues.
- Next, you need to verify that your microphone drivers are updated. You can do this through the device manager on your computer for compatibility and optimal functionality.
- Poor Sound Quality
In cases of subpar audio quality, users usually suffer from distortion and unclear audio that can be due to physical damage.
Fixes
- Right-click on the speaker icon in the taskbar and access “Sound settings” or a similar option. Then, fine-tune the input volume for your microphone to enhance the sound quality.
- Inspect the microphone for visible damage, loose connections, or frayed cables. If you replace damaged components, it contributes to improved sound quality.
- Microphone Echoing
Echoing issues can arise from software conflicts or audio feedback loops. Identifying conflicts can mitigate these problems for a smoother audio experience.
Fixes
- Users need to ensure that no other applications are simultaneously using the microphone that causes unwanted feedback or echo. Close unnecessary apps or mute their microphone access to address software conflicts.
- Another way includes the utilization of headphones while using the microphone to prevent audio feedback loops. It can significantly reduce echoing issues during audio input.
- Customer Support
Target has made it easy to deal with any potential issues with your mini microphones through the reliable support provided. You can start by consulting the user manual, a comprehensive guide accompanying the device that offers insights into setup. Also, you can get detailed instructions on problem-solving and optimal usage. Additionally, users can review the warranty card to understand coverage details and duration.
If challenges persist, it becomes crucial to contact customer support. Most manufacturers offer various communication channels, such as online platforms, email, or helpline numbers to seek help. The customer support team is well-prepared to address queries and guide you through troubleshooting. They offer solutions to ensure the smooth operation of your mini microphone. Finally, this collective support contributes to a positive experience to derive maximum value from your investments.
Conclusion
To sum up, using the mini microphone from Target opens up a world of enriched audio experiences. The available microphone types, ranging from USB Condenser Microphones to Wired Unidirectional Microphones, offer users a tailored audio solution for their specific requirements. Understanding the mini microphone’s features, functionalities, and insights into optimal usage, distances, and troubleshooting techniques empower individuals to fully exploit its capabilities.
The user manual, warranty card, and responsive customer support provide additional assistance layers for a positive and satisfying experience. From content creators to musicians and casual users, the mini microphone from Target stands out as a versatile and dependable companion to deliver exceptional audio quality in various scenarios.
FAQs Related to Mini Microphones from Target
Q1. How do I connect my mini microphone to my smartphone?
You can utilize any microphone that comes with a 3.5mm output if your smartphone has a 3.5mm headphone jack and doesn’t have a USB-C or Lightning port. As most smartphones use a TRRS jack, it’s essential to confirm that your microphone is equipped with a suitable TRRS connector. Alternatively, you can use a USB-C port for connection.
Q2. Can I use the mini microphone with a laptop or PC?
Yes, you have the flexibility to use a mini microphone with a laptop or PC. Simply insert it into an available USB port on your laptop or PC for those equipped with a USB connector. Furthermore, connect it to the designated microphone port on your laptop or PC using the suitable cable if the mini microphone utilizes a 3.5mm audio jack.
Q3. What apps are compatible with the mini microphone from Target?
The availability of apps compatible with the mini microphone from Target may vary depending on the model’s features. They are usually suitable for a broad range of recording and communication applications, such as:
- Audacity
- GarageBand
- Zoom
- Skype
- Voice Memos
- Discord
- TikTok
Q4. How do I charge my mini microphone?
To charge a mini mic, connect the microphone to a power source. First, insert one end of the provided micro-USB charging cable into the microphone and the other end into either a computer or a power outlet using the included adapter. After the LED indicator on the top of the mini microphone displays a red blink occurring every 2 seconds, it indicates that the charging process is finished.
Q5. Is the mini microphone compatible with both iOS and Android devices?
The mini microphone’s compatibility with iOS and Android devices relies on the model and connectivity. Those using standard connections like USB or 3.5mm audio jack generally work with a broad range of devices, including both iOS and Android. Also, USB-connected microphones need USB OTG support for mobile devices.
Q6. How can I improve the sound quality when using the mini microphone?
To enhance the voice quality with a mini mic, you should ensure proper placement close to the source. Furthermore, users need to adjust mic settings and use a pop filter for vocals. Then, choose a suitable recording environment with good acoustics. Essentially, keep drivers updated and perform post-processing with audio editing software for further enhancements.
Q7. What do I do if my mini microphone is not working?
If your mini microphone is not functioning, start by checking the physical connections to ensure it is properly plugged in. After that, test the microphone on another device to determine if the issue lies with the microphone or your current setup.
You can also update your device’s audio drivers from the manufacturer’s website to ensure compatibility. In addition to that, adjust system settings to make the microphone the default recording device.
Q8. Can the mini microphone be used for recording music or podcasts?
Yes, a mini microphone can be used for recording music or podcasts. You just have to ensure it has sufficient audio quality and sensitivity for your needs. To start the recording process, connect it to your recording device and set it as the default input. Now, adjust settings as necessary and test the microphone in your recording environment for optimal results.
Q9. How do I adjust the volume on my mini microphone?
If your mic is connected to a computer, access the system audio settings and adjust the input volume for the microphone. In contrast, some microphones may have a physical volume control knob that you can turn to increase or decrease the volume.
Q10. Is it possible to use the mini microphone for video conferencing?
Yes, it is possible to use the mini microphone for video conferencing. These mini microphones are primarily designed for your device’s headphone jack or USB jack for high audio quality for video calls. So, you should make sure that the device supports the external mic, so you select a mini microphone as an audio input source in video conferences.
Q11. What accessories come with the mini microphone from Target?
The accessories usually come along with a mini microphone from Target. For example, Target’s Vivitar Universal mini microphone comes with accessories like a 6-foot extension cable and mounting bracket. All these accessories make the microphone easy and versatile to use for people.
Q12. How do I properly clean and maintain my mini microphone?
When using the microphone for a long time, it is essential to clean and maintain it properly. The grid, caps, and foam windscreen must be removed while cleaning the microphone. It should be kept in a dry and clean environment when not in use for its maintenance. Moreover, keep the mini microphone in the pouch or bag after cleaning to avoid moisture and dust.
Q13. Can the mini microphone be used outdoors?
Yes, you can use a mini microphone outdoors as it is compact and lightweight. Therefore, it can be carried anywhere for outdoor shooting without any burden. While using the mini microphone outdoors, you should consider some points, such as wind and moisture protection. Furthermore, if the mini microphone requires power, ensure you have a reliable power source.
Q14. What is the battery life of the mini microphone?
The battery life of the mini microphone can be varied according to the type of the microphone. For example, the battery life of a cochlear wireless mini microphone is 10 to 11 hours. You should charge it three hours before use; even the indicator light shows a full battery. This microphone takes three hours to charge fully to use for different purposes.
Q15. Are there any color options available for the mini microphone from Target?
Yes, there are color options available for the mini microphone from Target. But the options are minimal, and you can choose the one that suits your requirements. A different color microphone makes your recording studio more attractive. For example, Deladola mini microphones come in a variety of colors for visually pleasing audio recording.
![How to Use Mini Microphone From Target? [Step by Step]](https://micwizard.com/wp-content/uploads/thumbs_dir/image-164-qk11xi53sp2s0x4o1hkvskn6moa3jdp1kx520ibubg.png)
![How to Use Mini Microphone From Target? [Step by Step]](https://micwizard.com/wp-content/uploads/thumbs_dir/image-67-qk12vf5gehi8ydv2znd99iiya73wa7cd8sksey1fss.jpeg)

![How to Use Mini Microphone with iPhone? [Quick Tips]](https://micwizard.com/wp-content/uploads/2024/03/image-21-336x220.png)
![How to Use a Mini Microphone from Temu [Step by Step]](https://micwizard.com/wp-content/uploads/2024/02/image-67-336x220.jpeg)

