Temu is your one-stop destination for various microphones that meet different audio needs. As you navigate the Temu website, you’ll find various microphone types that enhance your audio experience. Whether you want a portable option like wireless Lavalier microphones or dream of being a rockstar with karaoke mics, this website has something for you. Other than that, it offers hands-free mics with clip-on and lapel microphones.
Therefore, this diverse selection highlights Temu’s dedication to meeting the unique requirements of its users. If you’re curious about using mini microphones, keep reading to uncover the valuable insights to make full use of Temu microphones.
A Comprehensive Guide to Use Mini Microphone from Temu
The mini microphones provide flexibility and convenience for your audio projects. These compact yet powerful mini devices open up numerous opportunities to capture high-quality sound across various scenarios.
In this regard, Temu’s mini microphones stand out as an invaluable tool for content creators, journalists, or music enthusiasts. Now, we’ll discuss the thorough steps and considerations to maximize the benefits of your small gadgets for a smooth and enhanced audio experience.
1. Unboxing of Mini Microphone from Temu
When you open your microphone, it should contain a carefully selected set of essential items that make using it easy and straightforward. There should be a mini microphone inside the box and connectors for different devices like smartphones, cameras, laptops, and more to ensure compatibility. Also, a windscreen or foam cover should be there to reduce unwanted noise caused by air currents.
Moreover, the package can also include a durable carrying case for a secure and convenient way to carry your mini microphone wherever you go. There could be extra accessories or specialized features for specific models depending on the type of mini microphone.
Example of Mini Microphone Available on Temu
SENXIN SX9 Wireless Lavalier Microphone is available on Temu for only £18.98. It comes with intelligent noise reduction technology and an omnidirectional pickup. Now, let’s uncover what’s included in the box when you get this microphone from Temu:
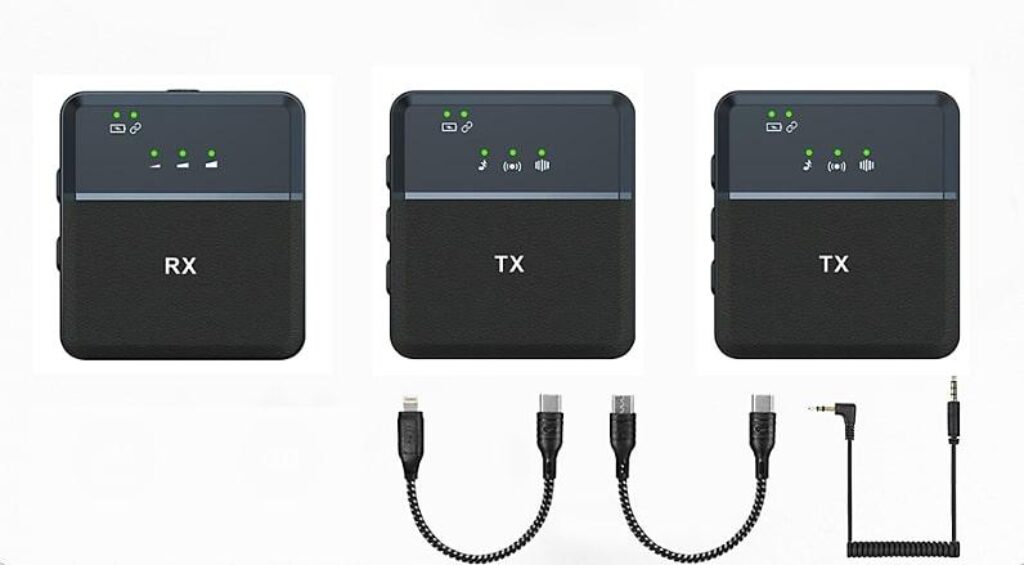
- 2 Transmitters
- 1 Receiver
- USB-C to USB-C Cable
- USB-C to Lightning Cable
- 3.55 TRRS Cable
- User Manual
2. Connection of Mini Microphone from Temu
It is crucial to recognize the flexibility and usefulness modern microphones provide in different recording situations before you connect them to your devices. When setting up your mini microphone with your device, the process differs based on the ports and connectors available on your microphone. Now, let’s explore the procedure of connecting a mic with a device for the best performance in audio.
Identify Your Device’s Audio Input Port
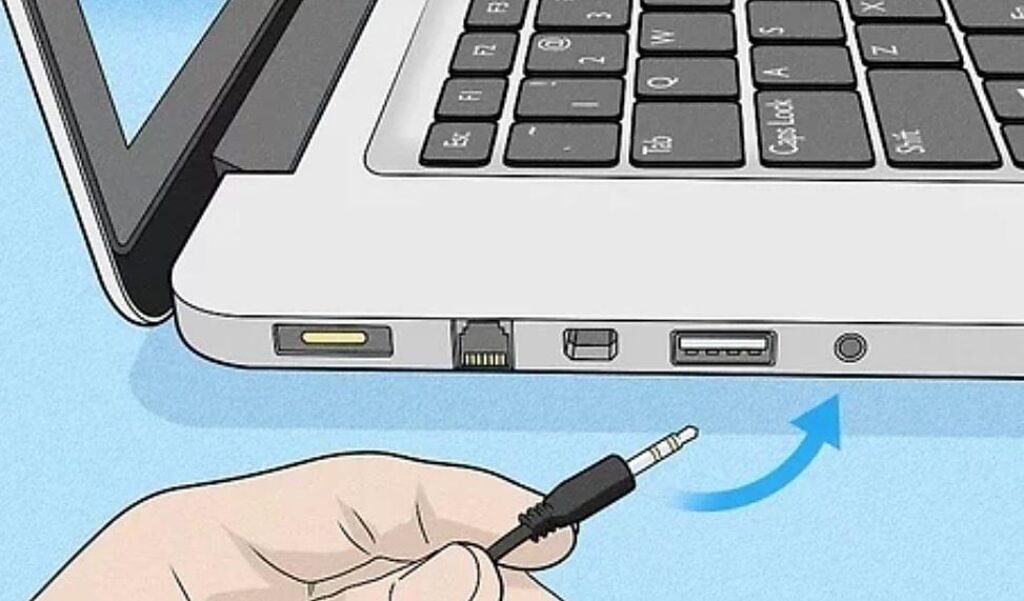
Firsthand, look around your device to find where you can plug in the mini microphone. This might be a USB-C port, a 3.5mm headphone jack, or any other specific spot meant for audio.
Connect the Microphone with Device Using the Compatible Cable
Once you’ve located the audio port, take the cable that came with your mini microphone. So, connect one end of the cable to the microphone itself. Then, ensure it is carefully attached to prevent any sound disruption. Afterward, plug the other end of the cable into the audio port on your device to ensure good-quality sound.
Use an Adapter for compatibility with Different Devices
Depending on your device and its connectivity options with other devices, you need a specialized adapter for a seamless audio experience.
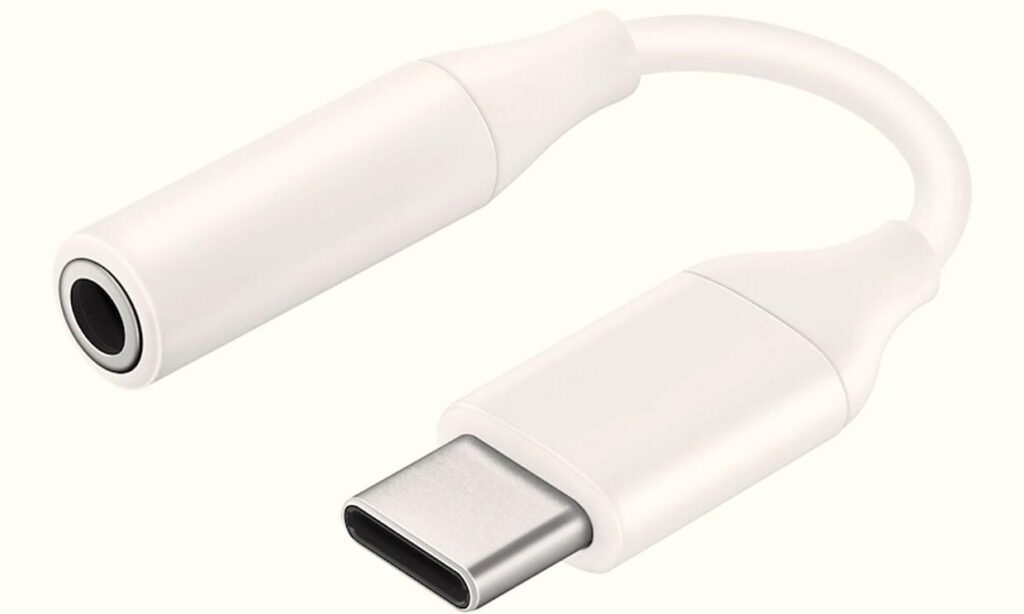
- For instance, if your device only has a USB-C port but your microphone uses a 3.5mm plug, you’ll need a USB-C to 3.5mm adapter. For this purpose, you can use a USB-C Headset jack adapter from Samsung to connect a mini microphone from Temu to your device.
- Similarly, you need a USB-C to USB adapter to connect the microphone if your device doesn’t have a regular audio input but has a USB-C port. This type of adapter is helpful when your mini microphone has a USB plug.

3. Mic Testing of Mini Microphones from Temu
Users can check a microphone’s performance on their smartphones or tablets by doing sound tests to see how clear and loud the audio is. This involves recording different kinds of sounds, like talking or playing music, to see how well the mini mic picks up different sounds and details.
In this way, you can determine how well it works and decide if it is right for your needs. Now, let’s explore the process of testing the microphone on computers in detail.
Step-by-Step Guide for Testing Mini Mic from Temu on PC
Step 1: Start the process by plugging one end of the connector to the microphone and the other to the computer into their relevant ports. You need to ensure that your device detects the mic after connecting through a 3.5mm jack or USB port.
Step 2: In the next step, open the start menu by clicking on the “Windows” icon. Then, navigate to “Settings” and select “System” from the options listed on the left sidebar. Later, proceed to click on “Sound” in the system configuration settings and choose the mics you want to test.
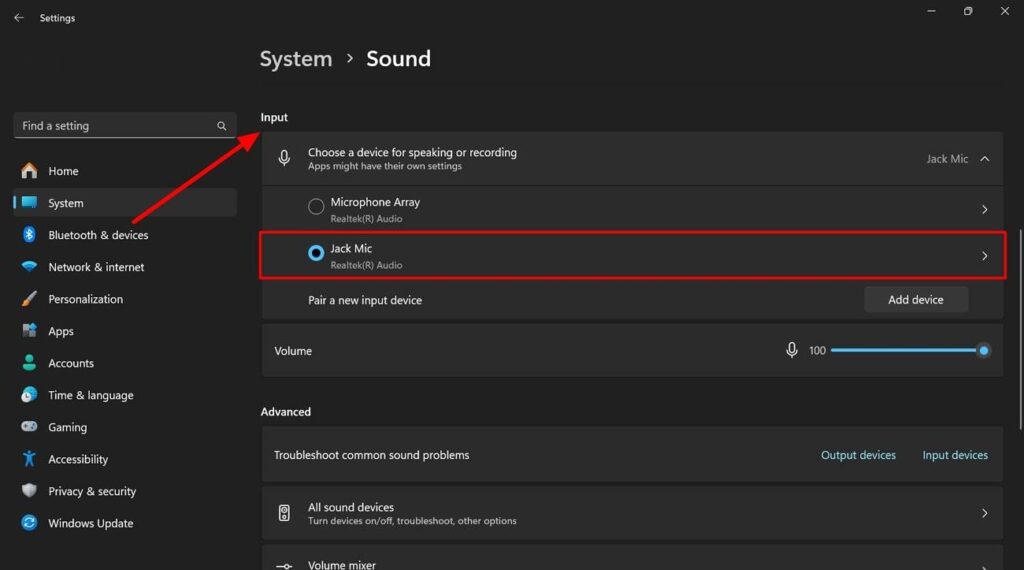
Step 3: In the sound properties, various options are available under the “Input Settings.” Now, head to the “Test Your Microphone” section and click the “Start test” button to assess the sound quality. Then, record a sound and play it to evaluate the microphone’s performance.

4. Adjustment of Mini Microphones from Temu
Achieving optimal quality with a mini microphone involves a blend of technical adjustments and practical considerations. Most USB mini microphones have a gain control dial that you can turn clockwise to elevate the gain. Try to set your input levels to approximately -12dB or around 75% of the maximum on your input gain meter. You can also opt to position the mini microphone 6-12 inches from the sound source for a better audio recording process.
Additionally, 2-6 inches is an ideal proximity distance for dynamic microphones. It is generally recommended to tilt your mini mics around 45 degrees in relation to the sound source to adjust the microphone’s angle. This positioning is effective in capturing the sound while reducing the impact of plosive sounds such as “p” and “b” sounds and the sibilance of harsh “s” sounds.
Furthermore, avoid aiming at reflective surfaces or rigid walls to prevent distortion. For cardioid mics, position the sound source in front and reduce side pickup. In addition, omnidirectional mics capture sound equally from all directions.
5. Usage Tips of Mini Microphones from Temu
It is essential to get familiar with some critical factors to ensure your microphone works at its best. Knowing these basic things will help you get the most out of your mini microphone and produce recordings that sound professional. Now, we’ll explore some useful tips to improve your recording experience using mini microphones from Temu:
- Check Compatibility: Before using a microphone, it’s essential to ensure that it works with your devices. Typically, the connectivity is carried out through a 3.5mm jack, as most mini mics come with this port to plug in the devices.
- Positioning: For hand-held microphones, hold it close to your mouth, about an inch or two away, without touching it. Furthermore, you should ensure that the front of the microphone faces your mouth. You can also place it three feet or more out to capture more ambient sound.
- Environmental Factors: If you’re recording outdoors, use a windscreen or foam cover to reduce wind noise. Other than that, you have to minimize background noise and avoid recording near sources of interference like air or electronics. You can use a windscreen or foam cover to reduce wind noise and ensure clear audio.
- Directionality: It’s crucial to understand how your mini microphone captures sound. Some are directional, focusing on specific sources, while others capture sound from all directions. You must be aware of directionality effects, which can increase bass frequencies to maintain a balanced sound.
- Monitoring: After connecting, adjust the volume and settings to improve audio quality. Use plugins like EQ and compression to enhance your voice. Moreover, don’t tap or bang on the microphone to test it. Be careful when setting it down to prevent damage and avoid holding it too tight.
6. Maintenance of Mini Microphones from Temu
Before we start discussing how to maintain mini microphones, it’s crucial to understand why taking care of these fragile audio tools is so vital. If you keep your microphone in good condition, it not only makes it last longer but also guarantees its consistent functionality and excellent sound recordings. Now, let’s look into some essential maintenance tips to keep your mini microphone working smoothly.
- As you know, moisture can harm the microphone’s delicate parts. After use, you should wipe it with a dry cloth to remove sweat or moisture. Additionally, you need to avoid exposing it to rain and excessive humidity for better performance.
- Also, dirt and dust can accumulate, affecting the functionality of microphones. To remove this dirt, gently clean with a soft brush or cloth and avoid harsh chemicals.
- Users should use a protective case or pouch when not in use to prevent damage or scratches on mini mics. Also, avoid direct sunlight or extreme temperatures.
- Moreover, check for wear or damage on the microphone cable and replace it promptly if needed to avoid further issues.
- You need to periodically inspect connectors for corrosion or damage. Plus, clean them gently if necessary and ensure they are securely plugged in.
Conclusion
In conclusion, we can become skilled in using the mini microphones from Temu by understanding their powerful features. Users can get carefully designed packaging by Temu with necessary accessories included within the box. By testing the mini microphone’s settings thoroughly, you can make the most of its ability to record top-notch audio.
Moreover, maintaining the microphone properly by keeping it dry, clean, and safely stored ensures it performs well for a long time. All in all, Temu provides you with mini microphones that can enhance your creative projects and capture all the details with accuracy.
FAQs about Mini Microphone from Temu
1. How Do You Connect Your Mini Microphone from Temu to Your Smartphone?
If your Android device has a 3.5mm jack, plug the mini mic’s 3.5mm connector into the jack. In case your device is equipped with a USB-C port, consider using an adapter or opting for a microphone compatible with USB-C. For iPhone 7 and above or Android phones, the recommended method is to connect through the Lightning or Type-C port.
2. What Are the Compatible Devices for the Mini Microphone from Temu?
The mini microphone offered by Temu is versatile and works seamlessly with different devices. It connects to Android devices through a USB-C port. Additionally, the mic utilizes a lightning connector for iOS devices. When used with Windows and Mac computers, it operates wirelessly and comes with a clip-on microphone that supports both USB-C and Lightning connectors.
Additionally, the Wireless Lavalier Microphone by Temu is versatile in nature. This microphone includes a 3.5mm receiver for cameras, a Lightning connector compatible with iOS devices, and a USB Type-C connection for Android devices and iPhone 15 series.
3. Troubleshooting: Why Isn’t My Mini Microphone from Temu Working?
When facing microphone issues, such as detection failure or poor sound quality, you need to ensure proper connection and updated drivers to troubleshoot. Moreover, adjust the input volume and inspect for physical damage to enhance sound quality.
Microphone echoing and feedback may result from software conflicts or audio loops. You can mitigate this issue by closing conflicting applications or muting their microphone access. Furthermore, the use of headphones while recording can prevent feedback loops to reduce echoing issues. These fixes aim to optimize mic performance and ensure a smoother audio experience.
4. Can I Use the Mini Microphone from Temu for Video Recording?
Yes, you can use the mini microphone from Temu for video recordings. One such example of a mini mic includes the Temu Wireless Lavalier microphone, which is suitable for audio and video recording purposes. It’s designed as a clip-on microphone compatible with iPhones, iPads, Android devices, and USB-C ports. One of its convenient features is that it doesn’t require charging, so you can simply plug it in and start recording.
5. How Do You Enhance Sound Quality With Your Mini Microphone from Temu?
You can optimize microphone performance by employing a pop filter to minimize mouth noises. Monitor audio levels for proper adjustment and utilize polar patterns like cardioid or omnidirectional for varied recording scenarios. Furthermore, you can adjust sound settings by connecting the microphone to an audio interface for digital conversion. Utilize the proximity effect by speaking near the microphone to enhance the clarity of the sound.
6. Is an App Required to Use the Mini Microphone from Temu?
No, you don’t need an app to use the mini microphone from Temu. You can simply connect it directly to your compatible device, like a smartphone or computer, using the right ports or connectors. Once connected, the microphone should work smoothly with the device’s built-in recording or communication apps without needing extra software or apps.
7. How Do You Properly Care for and Maintain Your Mini Microphone from Temu?
To maintain your mini microphone from Temu, clean the grille regularly with a mic cleaner or rubbing alcohol. Soak it in a mild detergent solution, scrub it with a toothbrush, and air dry. Additionally, store it in a protective case away from humidity and heat without attached cables. Keep cables dry and avoid cupping the mic to maintain airflow.
8. What Are the Best Settings for Using the Mini Microphone from Temu?
You can get the most out of the mini microphone from Temu by utilization adjusting the gain control to an optimal level. It is typically around -12dB or 75% of the maximum input gain to capture clear sound. Position the microphone close to your mouth for better audio quality and create a quieter recording environment with fewer hard surfaces to reduce background noise.
In addition, you can utilize accessories to enhance sound quality and set up EQ settings for a balanced audio output. Users can get their desired optimal results by focusing on high pass filters and low, mid-cut adjustments.
9. Can the Mini Microphone from Temu Be Used for Live Streaming?
Yes, the mini microphone from Temu is suitable for live-streaming purposes. It is a wireless clip-on microphone that’s easy to use and can enhance the audio quality of various content, including YouTube videos, interviews, and more.
USB and XLR microphones are both effective options for improving audio during streaming or gaming, depending on the recording environment. On the other hand, condenser microphones are ideal for capturing voices in promotional work, while dynamic mini microphones excel at picking up audio in noisy environments.
10. How Do You Resolve Audio Delay Issues with the Mini Microphone from Temu?
You can resolve audio delay issues with the mini microphone from Temu with practical strategies and considerations. By adjusting buffer size cautiously, as too low can cause glitches, you can reduce latency. Furthermore, check Bluetooth connections for corruption and ensure correct microphone connections to the audio interface or mixer. You can also replace damaged cables to eliminate delay sources for optimal performance.
![How to Use a Mini Microphone from Temu [Step by Step]](https://micwizard.com/wp-content/uploads/thumbs_dir/image-55-qk12pb77z955hmqko0ak2213a1809136ejx6473k8s.jpeg)
![How to Use a Mini Microphone from Temu [Step by Step]](https://micwizard.com/wp-content/uploads/thumbs_dir/image-qkpngjvzv93acr16sdrnj08jhwiaetb3vk706ay1x8.png)

![How to Use Mini Microphone with iPhone? [Quick Tips]](https://micwizard.com/wp-content/uploads/2024/03/image-21-336x220.png)
![How to Use Mini Microphone From Target? [Step by Step]](https://micwizard.com/wp-content/uploads/2024/02/image-55-336x220.jpeg)
