Mini microphones are gaining popularity among smartphone enthusiasts, especially vloggers and audio recorders. While the internal microphones deliver acceptable audio in phones and laptops, mini microphones elevate sound quality and clarity. This article explores the reasons behind the surge in mini microphone usage and provides insights into effectively using them with laptops as well as other devices.
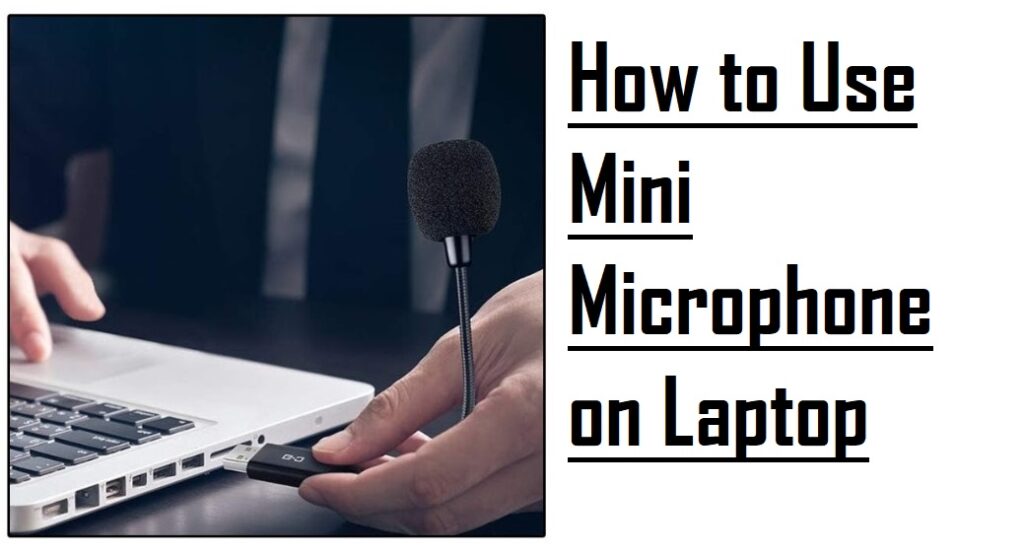
Mini microphones have become indispensable tools for users looking to enhance their audio experience on laptops. Whether you’re a content creator, a remote worker, or simply someone who values crystal-clear sound, understanding how to effectively use a mini microphone can greatly elevate your computing experience. In this comprehensive guide, we will delve into the details of connecting, configuring, and optimizing your mini microphone on a laptop, providing you with the knowledge to make the most out of this compact yet powerful accessory.
Understanding Mini Microphones
Mini microphones, compact audio devices tailored for laptops, smartphones, hearing aids, and various audio gadgets, offer exceptional portability and high-quality audio capture. To grasp their essence, consider the following insights:
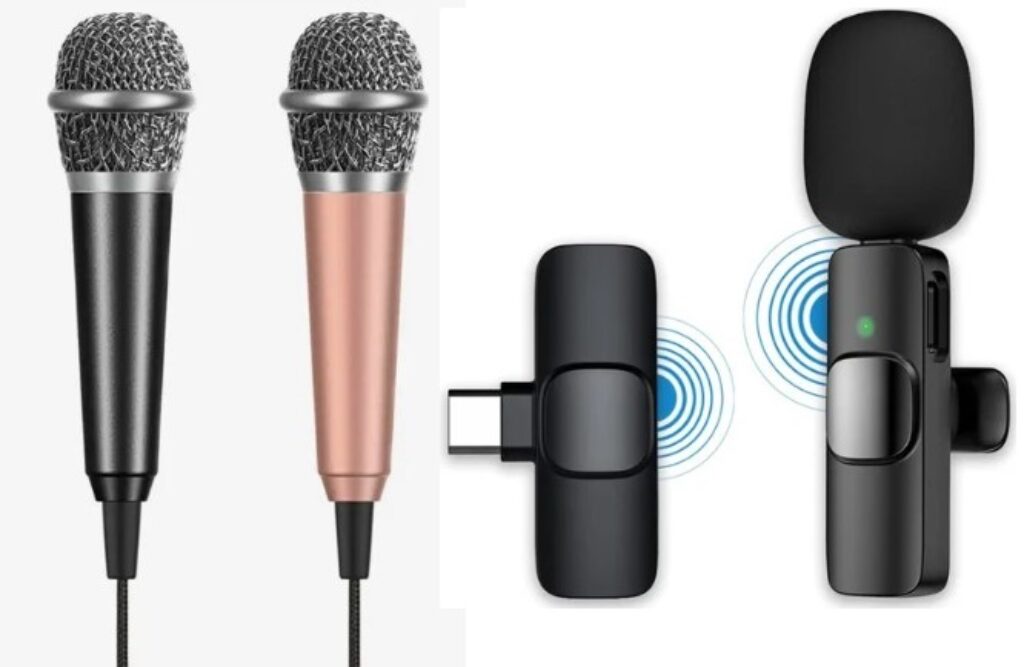
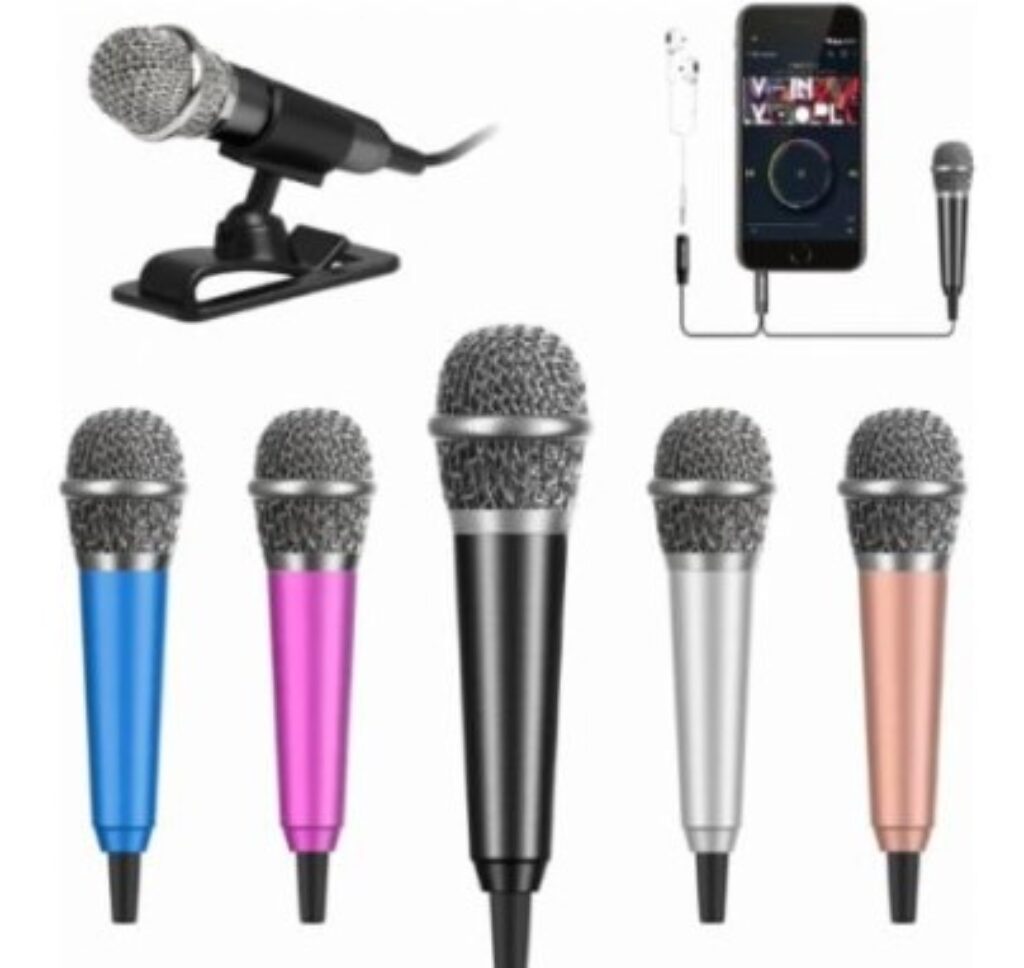
Types of Mini Microphones
Two prevalent variants exist, wired and wireless. Wired mini microphones directly link to your device’s audio jack, while wireless counterparts connect via Bluetooth or other wireless technologies.
Benefits of Mini Microphones
These devices enhance audio recording quality by mitigating background noise and augmenting speech clarity. Beyond their portability, mini microphones prove ideal for effortless on-the-go recording.
Considerations for Mini Microphone Usage with Laptop
For optimal performance of mini microphones with your laptop, consider the following aspects for a seamless experience:
Compatibility Considerations
Before purchasing, ensure compatibility with your device. Some mini microphones cater to specific smartphones or other devices, while others boast universal compatibility. Ensure the mini microphone harmonizes effortlessly with your laptop’s operating system for seamless integration and optimal performance.
Connecting the Mini Microphone
Connection and usage with a laptop is straightforward, either plug the mini microphone into your device or pair it wirelessly. Upon connection, customize settings, adjusting volume and other parameters to optimize audio quality. We’ll take the Rode NT-USB Mini Microphone as an instance for the clear instructions of using a mini microphone on a laptop.
Connecting the Rode NT-USB Mini to Your Laptop
To seamlessly connect your NT-USB Mini to your computer, follow these steps:
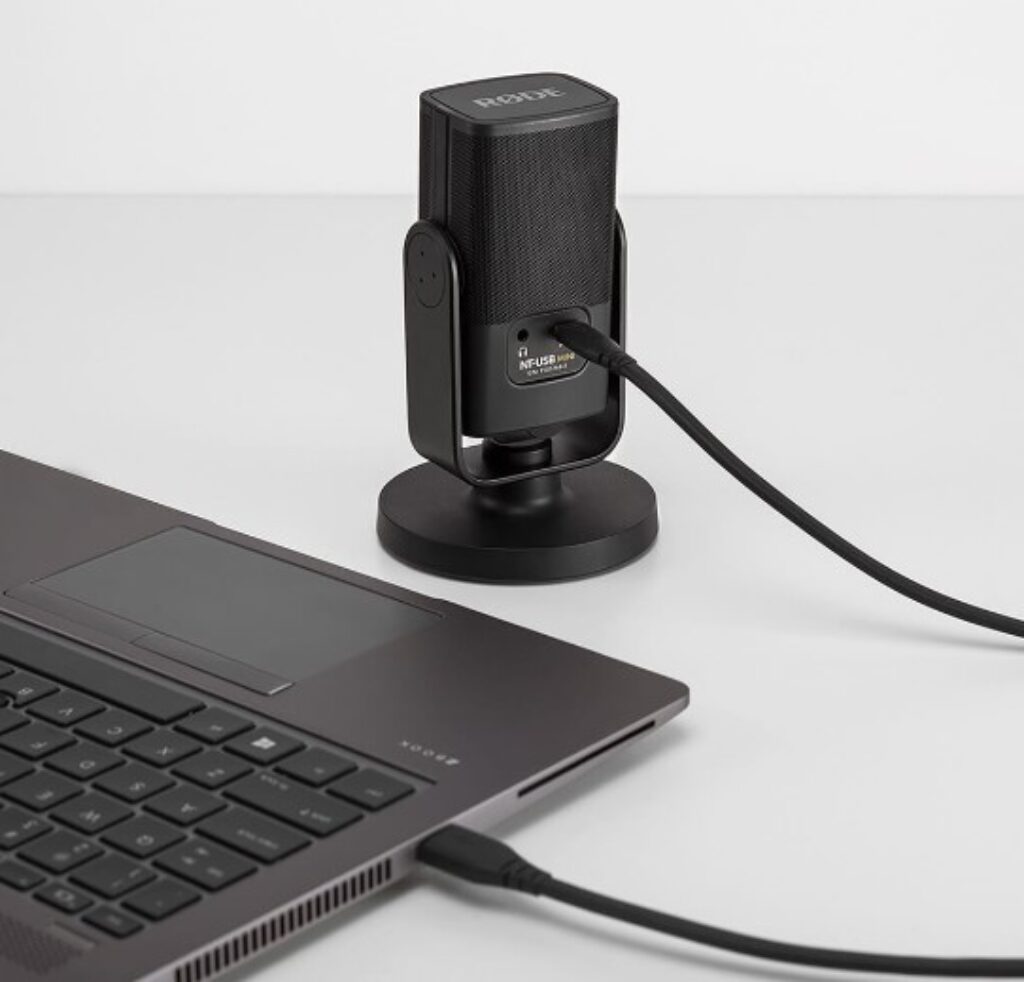
- The NT-USB Mini is equipped with a USB-C output at the back. Utilize the provided USB-C to USB-A cable to establish a connection with your laptop/pc.
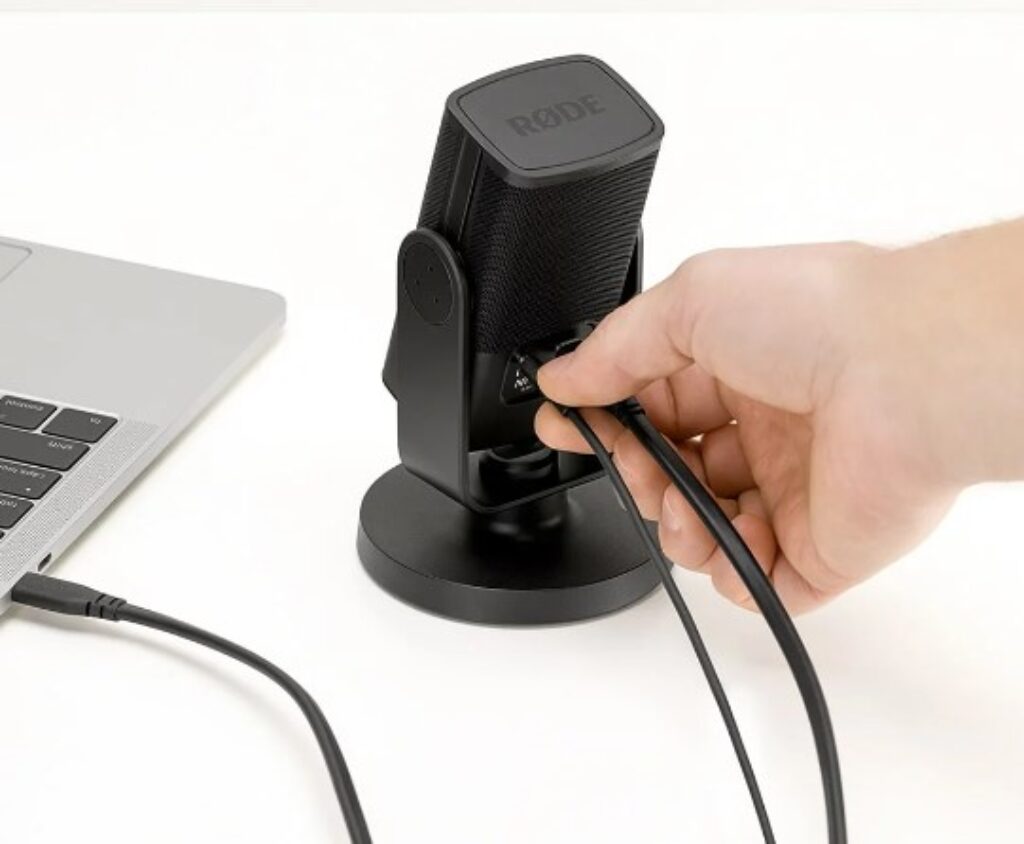
- Benefit from the NT-USB Mini’s class-compliant USB-C connector, ensuring compatibility with any PC or Mac that supports class-compliant audio. Some Android devices also adhere to this standard.
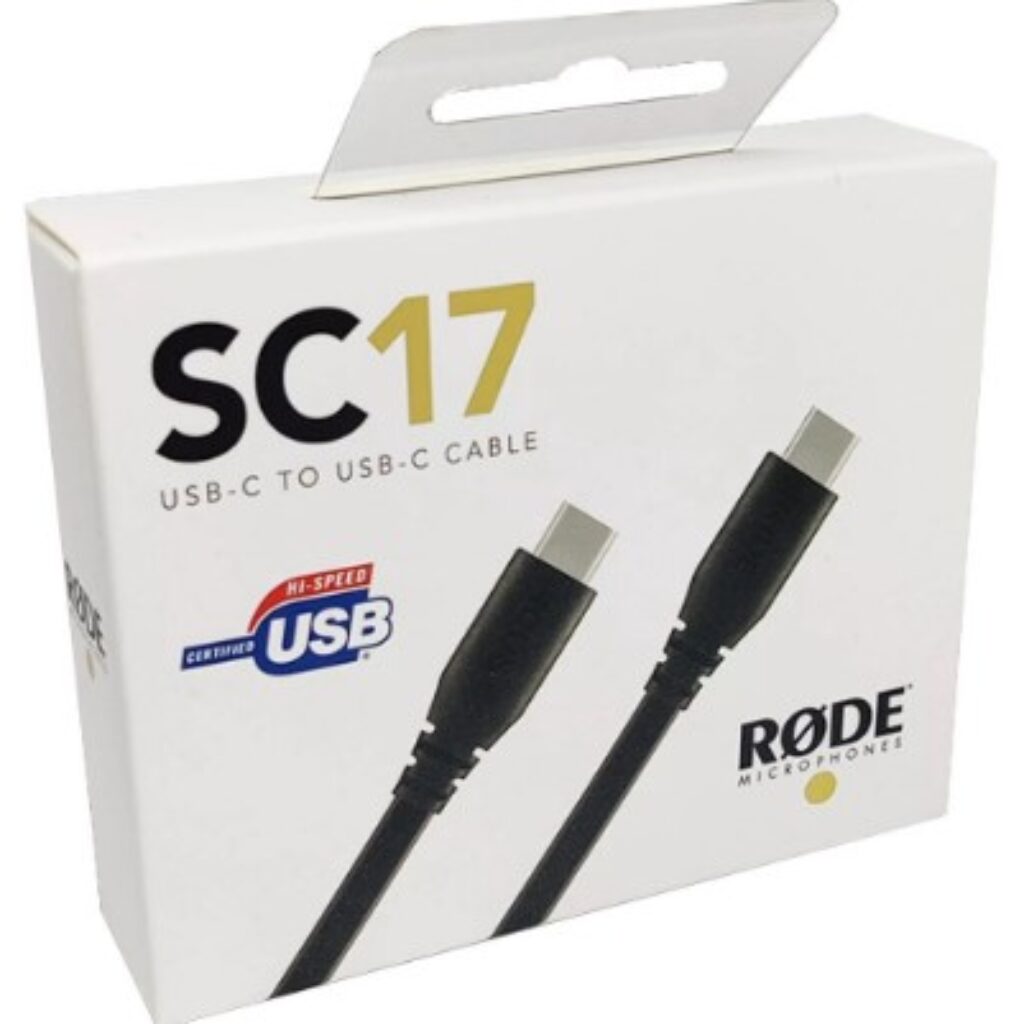
- If your device boasts a USB-C input, opt for the SC17 USB-C to USB-C cable. This cable also caters to the iPad Pro, featuring a USB-C input.
- For macOS devices with a Lightning port, employ an Apple Lightning to USB Camera Adapter to enable proper functionality of the Rode NT-USB Mini.
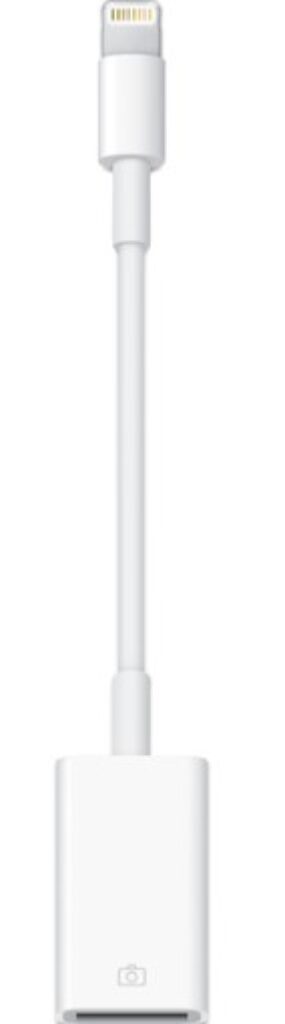
Note: If a warning about power consumption appears when using a Lightning adapter, resolve it by connecting the Lightning port to a USB power supply.
Once connected, the right LED on the front will illuminate, confirming a successful connection. The Rode NT-USB Mini requires no additional drivers or software, simply plug it in, connect and commence your recording!
Setting Up Your Rode NT-USB Mini
Before recording with the Rode NT-USB Mini, ensure a smooth setup by following these steps:
- Navigate to system settings on your computer or mobile device.
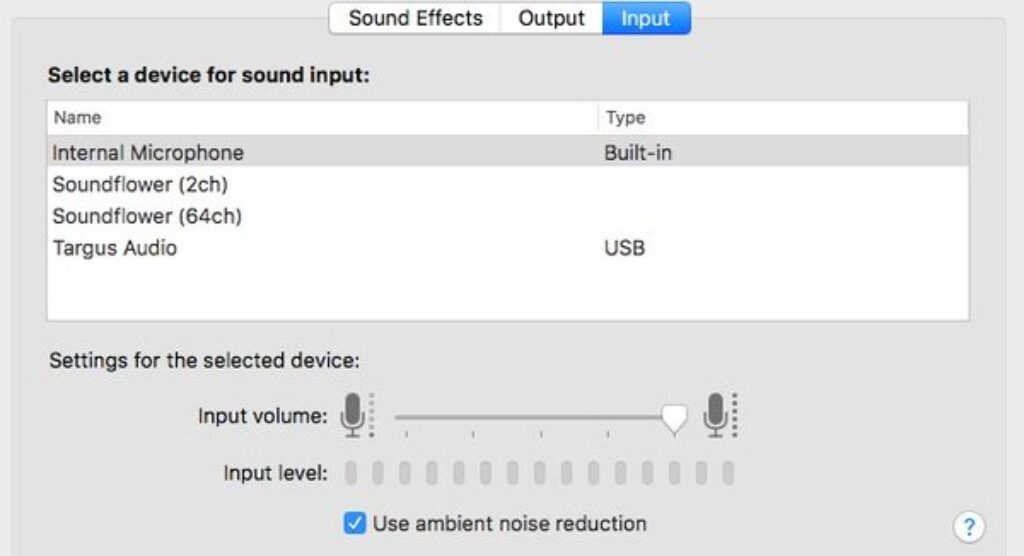
- On a Mac, go to ‘System Preferences’ > ‘Sound’ > ‘Input’ and ‘Output.’
- For a Laptop/PC, access ‘Sound Settings’ by right-clicking the speaker icon in your toolbar.
- After this initial setup, your device should automatically recognize the Rode NT-USB Mini upon future connections, streamlining the process for seamless usability.
Testing the Rode NT-USB Mini Microphone
Record a brief clip or utilize the built-in sound test feature to assess the microphone’s audio levels and overall quality. This step ensures a quick and effective evaluation of your mini microphone’s performance.
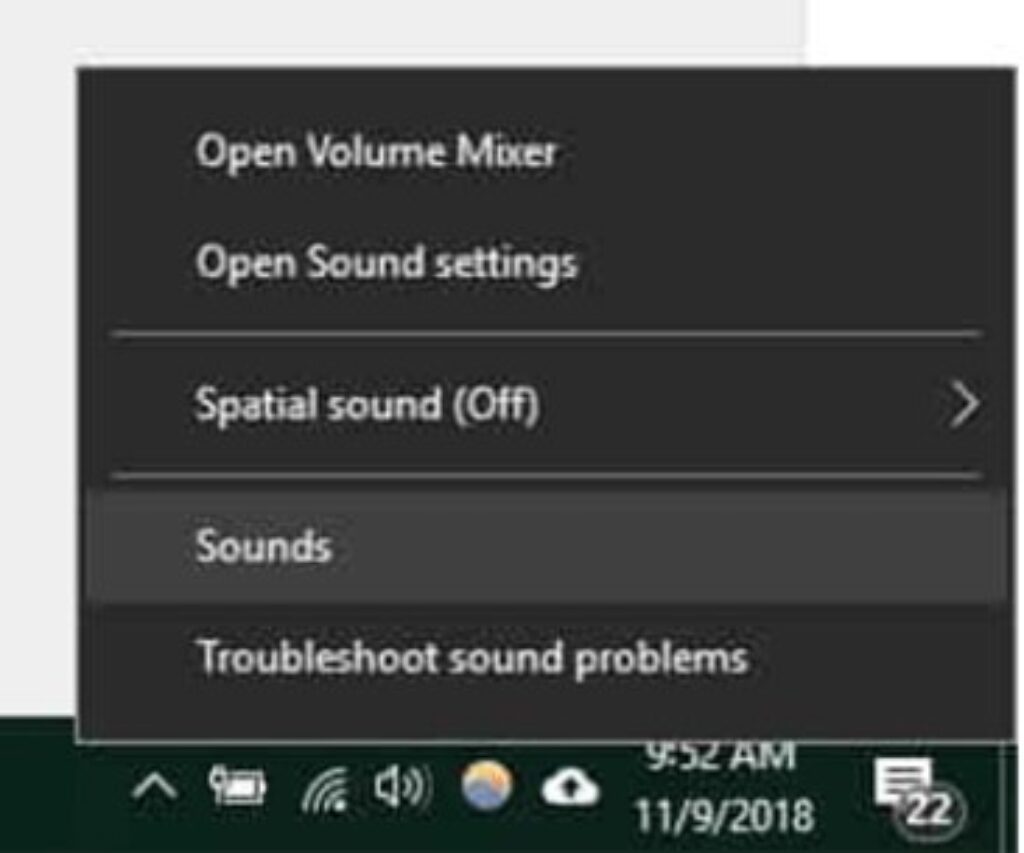
- Right-click the volume icon located in the lower-right corner of your screen within the taskbar.
- Select the Sounds option from the menu that appears.

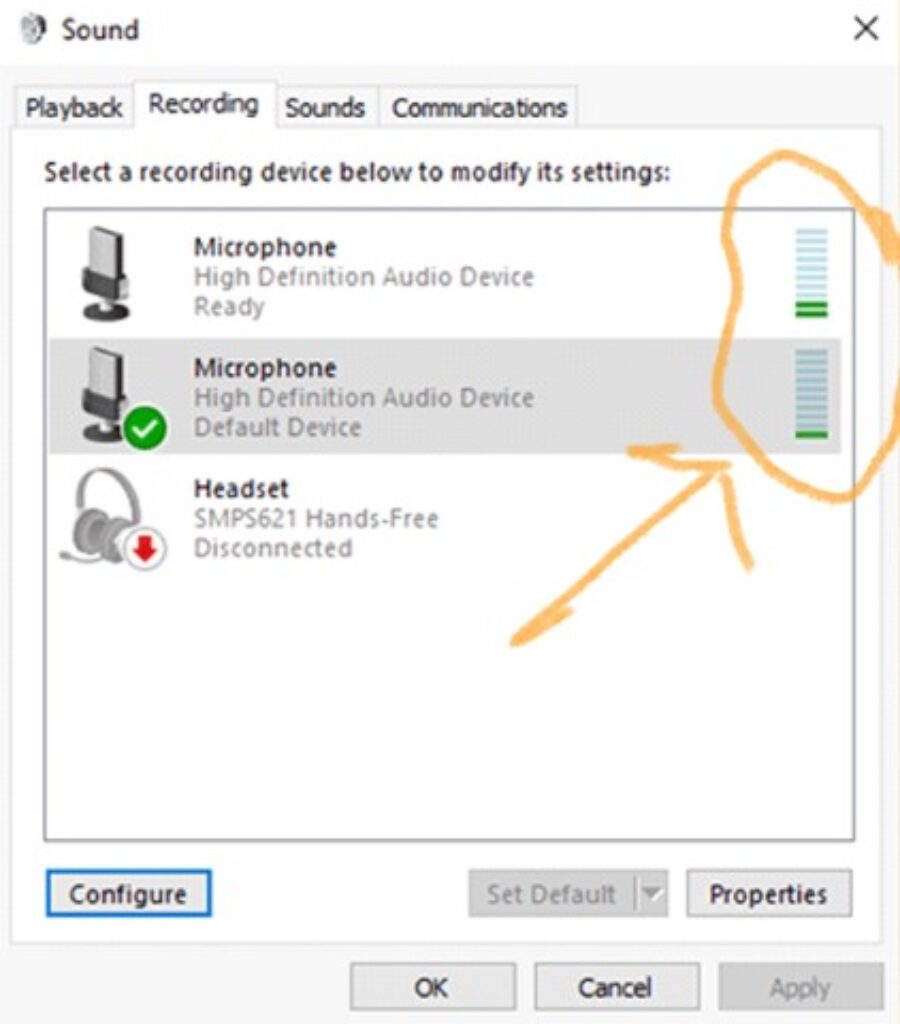
- Switch to the Recording tab to view a list of your installed devices.
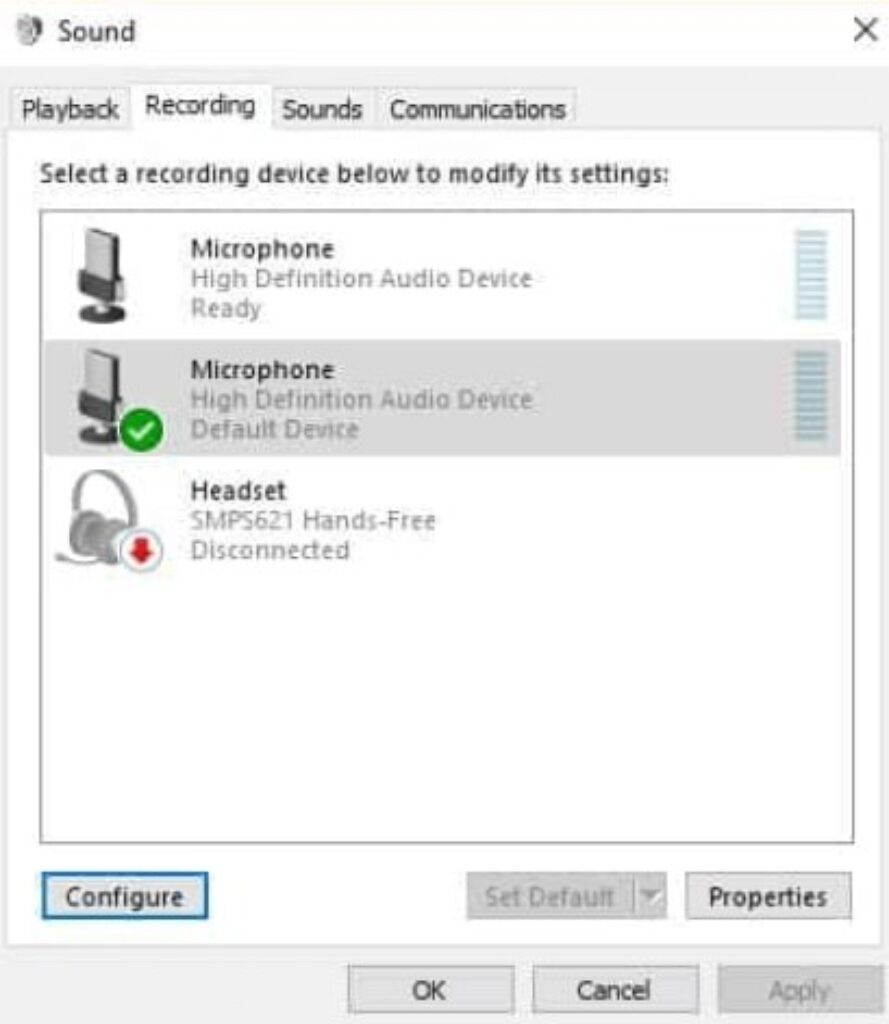
- Speak into the microphone and observe the movement of the green bars next to your device. If the green bars respond to your voice by moving up and down, your device is working correctly.
Setting Your Rode NT-USB Mini Microphone as Default
To ensure that your external mini microphone serves as the default sound input device, you can access this setting through two distinct methods.
Using Settings
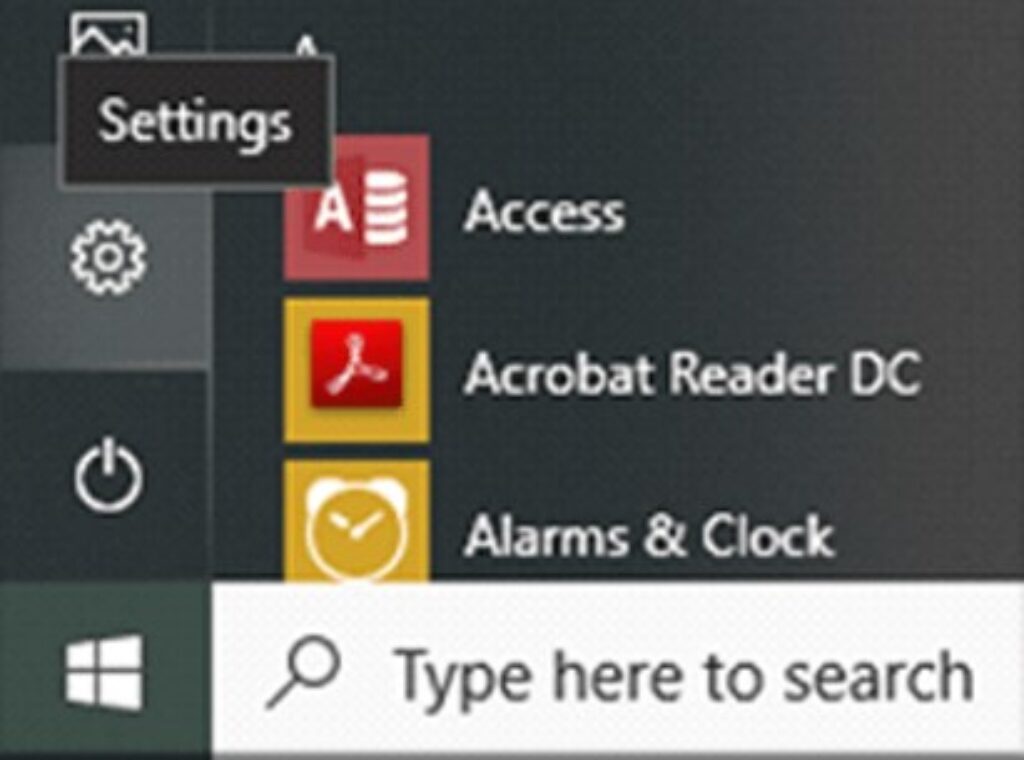
- Access Settings by either typing it into the search bar or clicking the Windows button and selecting the gear icon.
- Open Settings and click on the System icon.
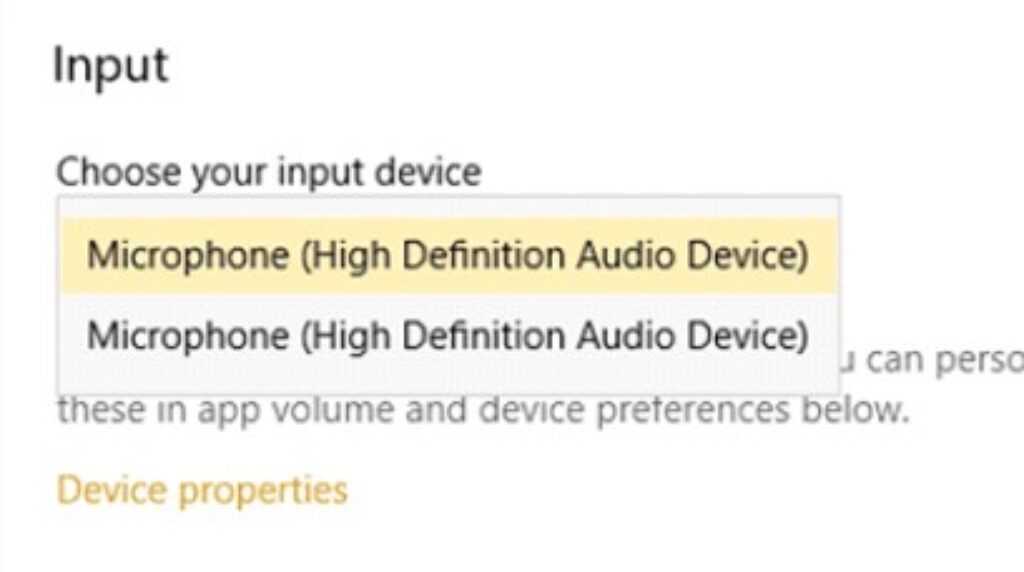
- Choose Sound on the left side of the screen.

- From the drop-down menu on the right side, select your preferred input device.
Via Control Panel
- Go for the Control Panel by typing the words into the search box on your taskbar.
- Open the Control Panel and select the Hardware and Sound icon.
- Navigate to the Recording tab.
- Right-click on the desired recording device and choose the option to Set as Default Device.
- Click OK to confirm.
Optimizing Mic Settings for Your Laptop
For Windows OS
Laptops, often utilized for more sophisticated tasks, provide manual control over microphone sensitivity in Windows settings. Follow these steps to make adjustments:
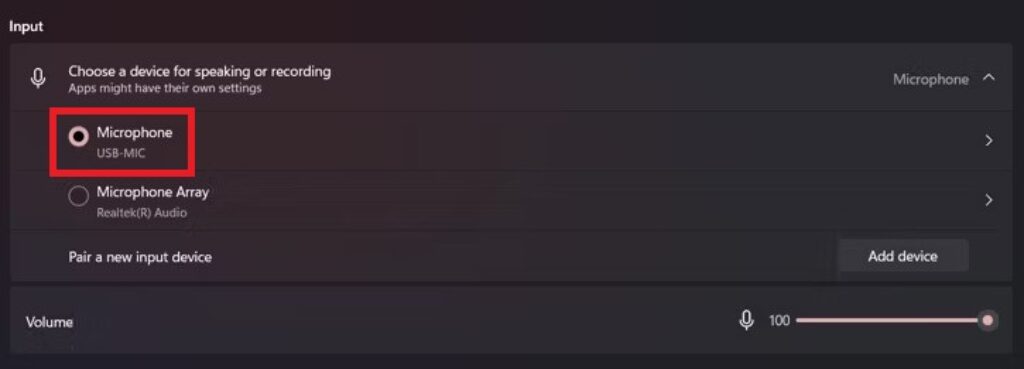
- Open Windows System Settings, navigating to System > Sound.

- Under Input, confirm the correct mic is selected.
- Adjust the Volume slider under Input to ensure clear voice transmission.
- Click on your chosen microphone to access additional settings.
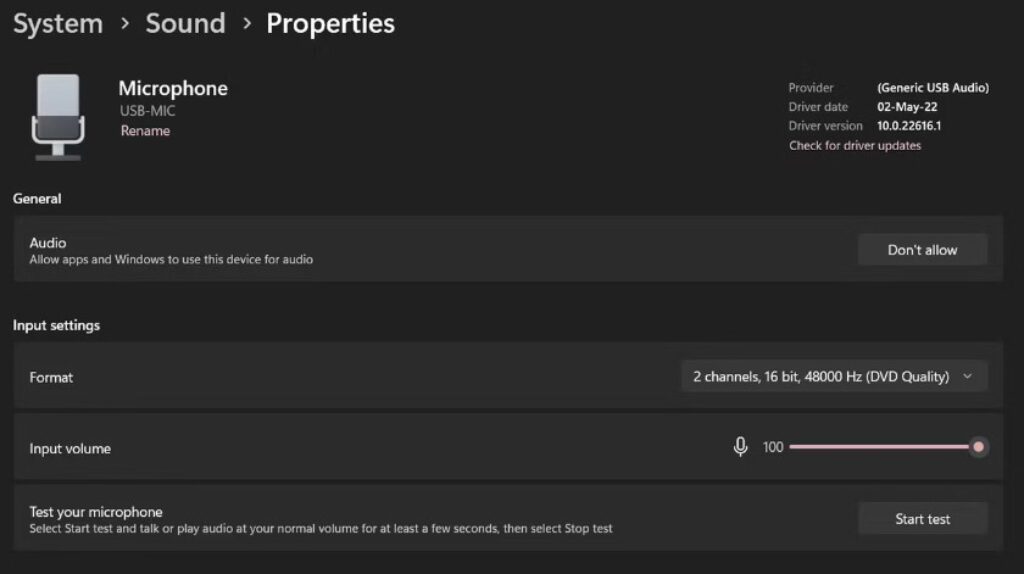
- Fine-tune the Input volume slider in the microphone’s properties as required.
- Initiate the Start test to gauge the microphone’s detection of your voice.
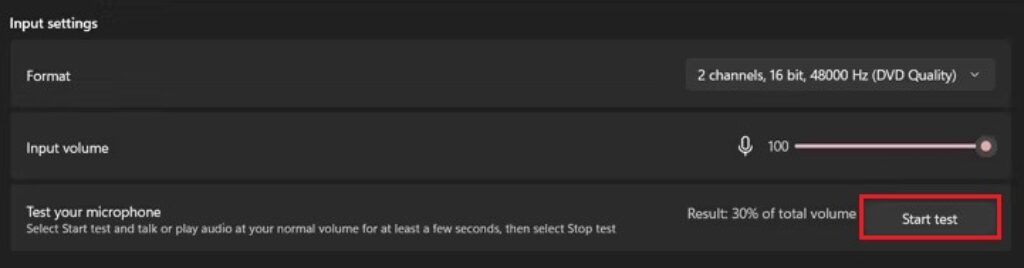
- Once the regular speaking voice test concludes, press Stop test.
- A result of 20% and above is optimal for capturing your voice without picking up background noises.
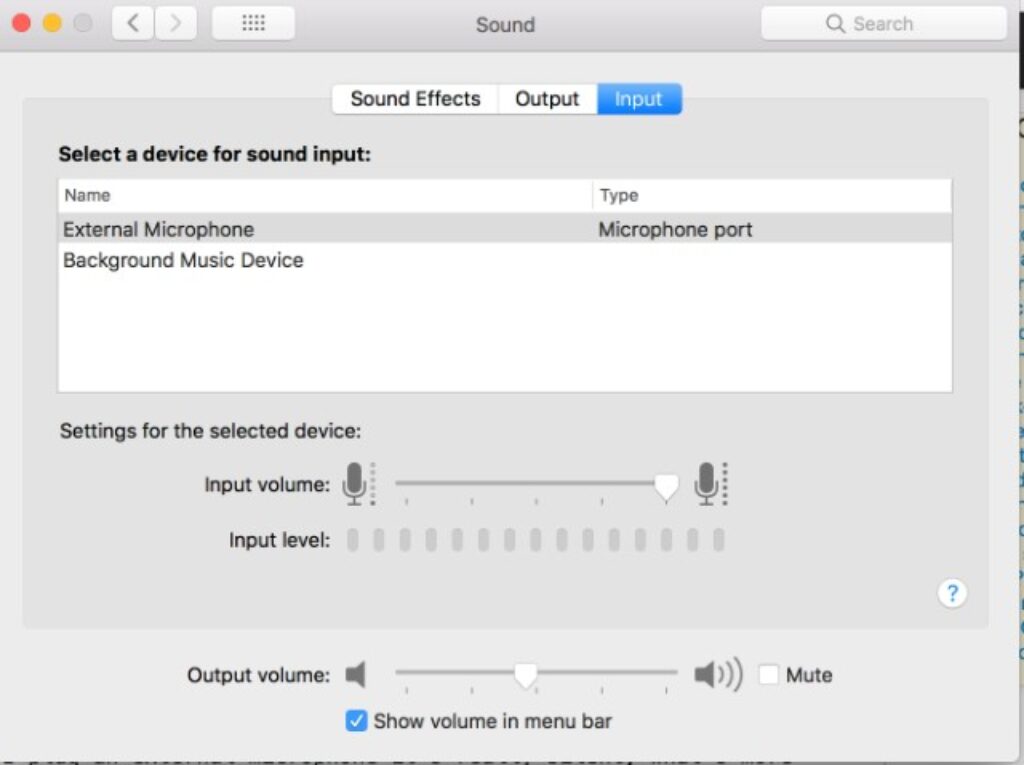
For macOS
macOS simplifies the process of adjusting your microphone sensitivity. Given Apple’s renowned microphones on its iPhones and MacBooks, it’s advisable to test the built-in mic before opting for an external one, and if you do, choose reputable brands like Rode and Shure.
Here’s how to fine-tune your macOS microphone sensitivity:
- Open System Settings > Sound.
- Scroll down to Output & Input.
- Click on Input to access microphone settings, ensuring you choose the desired microphone for adjustment.
- As you adjust the Input volume slider, observe the Input level. A 20% to 30% level generally suffices for most purposes.
Troubleshooting Tips
Despite their versatility, mini microphones may encounter occasional issues. Here are common problems and efficient troubleshooting steps:
Check Connections
Ensure the mini microphone is securely connected to your laptop’s audio jack or USB port. A loose connection can lead to recognition problems.
No Sound
Ensure proper microphone connection and device recognition. If recognized but no sound, adjust microphone settings in the app or try an alternative application.
Background Noise
Combat background noise by employing noise-canceling apps. Adjust microphone settings to minimize background noise, particularly in noisy surroundings.
Distortion or Clipping
Address distorted recordings by reducing microphone gain. Experiment with adjusting the microphone’s distance from the sound source to alleviate clipping.
Check for Interference
External interference from nearby electronic devices or crowded frequencies can impact microphone performance. Ensure a quiet environment for optimal results.
Test in Different Applications
Check the mini microphone’s performance in various applications. Recognition or sound quality issues in one app may be specific to its settings.
Conclusion
In conclusion, mastering the use of mini microphones with laptops unveils a world of enhanced audio experiences. From choosing the right microphone to troubleshooting common issues, this comprehensive guide empowers users to seamlessly integrate mini microphones and elevate their audio game. Whether you’re into podcasting, gaming, or virtual meetings, these insights ensure optimal performance, making your laptop a powerful audio hub.
We value your input! Share your thoughts on this guide, did it meet your expectations? How can we enhance your understanding further? Your feedback drives our commitment to delivering insightful and user-friendly content. Let us know your thoughts, suggestions, or any specific topics you’d like us to cover in the future. Your opinion is instrumental in shaping the quality and relevance of our articles.
Frequently Asked Questions
How do I connect a mini microphone to my laptop?
Connecting your mini microphone to your laptop is straightforward. Locate the audio jack or USB port on your laptop and securely plug in the mini microphone. Ensure a snug connection to optimize performance and functionality.
Can I use a mini microphone with any laptop model?
In general, mini microphones are compatible with various laptop models. However, it’s essential to verify compatibility by checking the specific operating system of your laptop to ensure seamless integration.
What are the steps to configure a mini microphone on Windows 10?
Configure your mini microphone on Windows 10 by accessing the sound settings. Set the mini microphone as the default recording device and fine-tune settings according to your preferences for an optimal audio experience.
How do I troubleshoot a mini microphone not recognized by my laptop?
If your mini microphone is not recognized, check the connections for security, confirm compatibility with your laptop’s operating system, update drivers, and refer to the manufacturer’s guidelines for specific troubleshooting steps.
Is it necessary to install drivers for a mini microphone?
Yes, installing the latest drivers for your mini microphone is crucial. This ensures compatibility with your laptop and optimizes performance, addressing potential recognition issues.
How can I improve the sound quality of a mini microphone on my laptop?
Enhance sound quality by adjusting the microphone’s volume and sensitivity settings. Consider using additional accessories like pop filters or windshields to minimize unwanted noise and achieve clear audio recordings.
Can I use a mini microphone for video conferencing on my laptop?
Absolutely. Set your mini microphone as the default recording device in your preferred video conferencing application’s settings to ensure high-quality audio during virtual meetings.
How do I switch from my laptop’s built-in microphone to a mini microphone?
Easily switch to your mini microphone by accessing your laptop’s sound settings. Select the mini microphone as the default recording device and adjust settings accordingly for seamless integration.
What are the compatibility considerations for using a mini microphone with a Mac laptop?
Confirm compatibility with the Mac operating system before using a mini microphone. Follow similar setup steps outlined for Windows to ensure optimal performance.
How do I adjust the volume and sensitivity of a mini microphone in laptop settings?
Navigate to your laptop’s sound settings, locate the mini microphone, and fine-tune the volume and sensitivity sliders to customize audio levels based on your preferences.
Can I use a mini microphone for recording music on my laptop?
Yes, mini microphones are suitable for recording music on your laptop. Adjust settings for optimal sound quality and consider using dedicated audio recording software for better control.
Are there any software recommendations for enhancing mini microphone performance on laptops?
Explore reputable audio enhancement software like Voice Memos, Audacity, or GarageBand are available to optimize the performance of your mini microphone, ensuring clear and high-quality audio recordings.
How do I properly care for and store my mini microphone when not in use?
Preserve your mini microphone by using a protective case, storing it in a dry environment, and avoiding exposure to extreme temperatures. This ensures the longevity of your device.
What are the common issues faced while using a mini microphone on laptops and their solutions?
Common issues, such as recognition problems, poor sound quality, or interference, with troubleshooting tips provided earlier like connection check, compatibility check etc. These solutions guide you in resolving challenges for an enhanced user experience.
How can I test if my mini microphone is working correctly with my laptop?
Conduct a simple test by recording a short clip, using sound test features available in your laptop settings, or checking audio input settings. This ensures that your mini microphone is functioning correctly and ready for use.


![How to Use Mini Microphone with iPhone? [Quick Tips]](https://micwizard.com/wp-content/uploads/2024/03/image-21-336x220.png)
![How to Use a Mini Microphone from Temu [Step by Step]](https://micwizard.com/wp-content/uploads/2024/02/image-67-336x220.jpeg)
![How to Use Mini Microphone From Target? [Step by Step]](https://micwizard.com/wp-content/uploads/2024/02/image-55-336x220.jpeg)