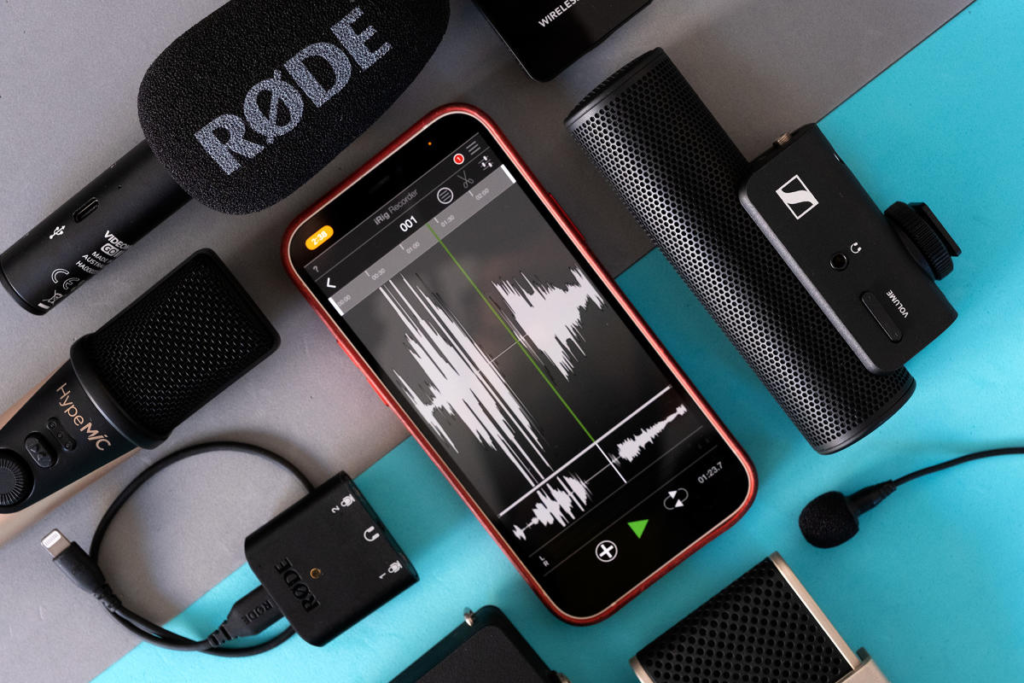
With their impressive capabilities, mini microphones have broadened the potential of high-quality audio recordings and crystal-clear communication. These mics enhance the audio quality, making them exceptional for recording podcasts and improving professional communication.
However, analyzing and harnessing the full potential for better sound quality and improved recordings is essential. Therefore, this guide will provide a complete understanding of how to use a mini microphone on your phone. Also, to improve conversations and low-quality recordings, it must analyze the full of your smartphones with mics.
Selecting the Right Mini Microphone
Whether you are recording podcasts or interviews, choosing a mic that will enhance versatility and clarity is essential. Therefore, for seamless audio recordings, it’s crucial to understand the mic key factors to achieve optimal audio quality.
- Compatibility Check
When considering the compatibility check for a microphone, it’s essential to analyze its seamless connectivity and integration. Therefore, ensuring compatibility of connector types, operating systems, and wireless connectivity is crucial. Also, microphones will have enhanced functionality and compatibility when running on specific operating systems.
- iOS Compatibility: Microphones with MFi (made for iPhone) certification or Lightning Adaptor provide seamless iOS device integration.
- Android Compatibility: Mics with the headphone jack or TRRS connectors, USB-C adapters, or wireless connectivity (Bluetooth) provide more comprehensive support to Android phones.
- Noise Reduction
Microphones with built-in noise-reduction technology are preferred when using a mic in a noisy environment. Therefore, it’s essential to consider the microphone that can reduce unwanted noises and bring clarity to your recordings.
- Directionality
Mini microphones are available in versatile directional patterns such as omnidirectional, unidirectional, or super-cardioid. An omnidirectional mic picks up sound from all directions and can only be used in a closed environment.
However, unidirectional picks audio from one direction, and super-cardioid picks from specific directions. Therefore, choosing a directional pattern according to your use is essential to your needs.
- Portability
The compact size and lightweight design of the mini microphones make them ideal for on-the-go recordings. So, balancing size and weight is crucial to ensure convenience for seamless audio quality performance.
Setting your Mini Microphone
Whether you are a seasoned podcaster or content creator, the mini microphone is essential to achieve high-quality audio recordings. Therefore, using the mic with your smartphone can enhance the quality and bring clarity to your conversations. After selecting the right microphone, it’s essential to understand connecting and adjusting audio quality settings for optimal sound quality.
Connecting the Mini Microphone to your Phone:
Before connecting the microphone, ensure that it is compatible according to the connector type of your phone. Wireless connections such as Bluetooth and a 3.5mm audio jack are commonly used to connect the microphone to your phone. However, in the absence of an audio jack, an adapter is used to set up the connection.
- Headphone Jack Method:
For Android users, connecting the mini microphone to the smartphone follows a simple procedure. So, hereunder is the step-by-step guide for a simple and secure connection:
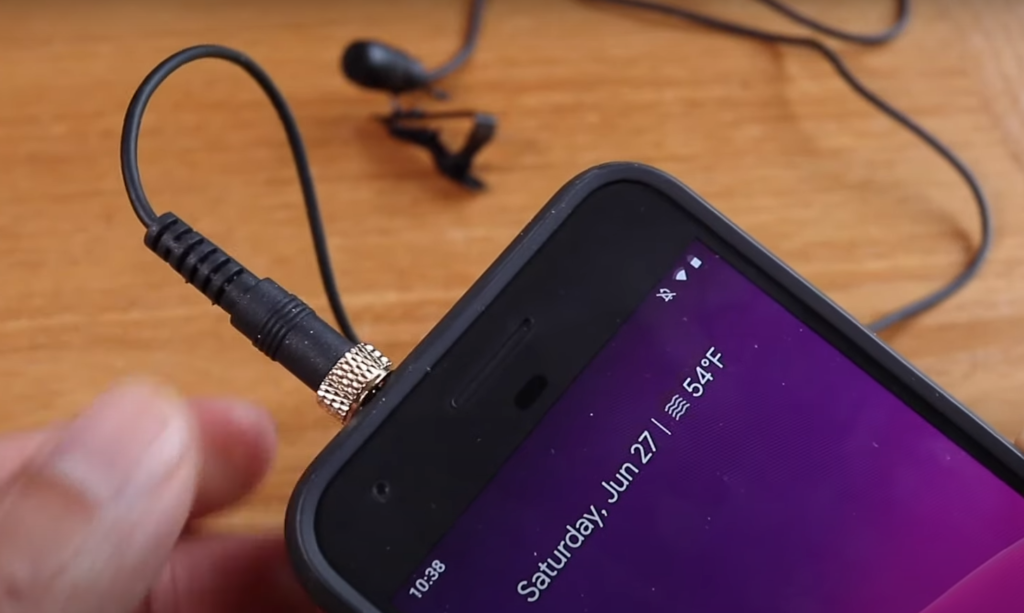
- First, locate the 3.5mm headphone jack, typically at the bottom of your phone, depending on the model.
- Then, insert the 3.5mm audio plug of the mic into the phone jack.
- Ensure it is tight and firmly attached to have a stable audio quality.
Note: iPhone 6 or older models have a headphone jack used for plugging the mic directly into the audio socket. However, newer iPhone models are without an audio jack, and an additional adapter is required to connect the mic. The following step-by-step process can connect microphones with TRS or TRRS plugs.
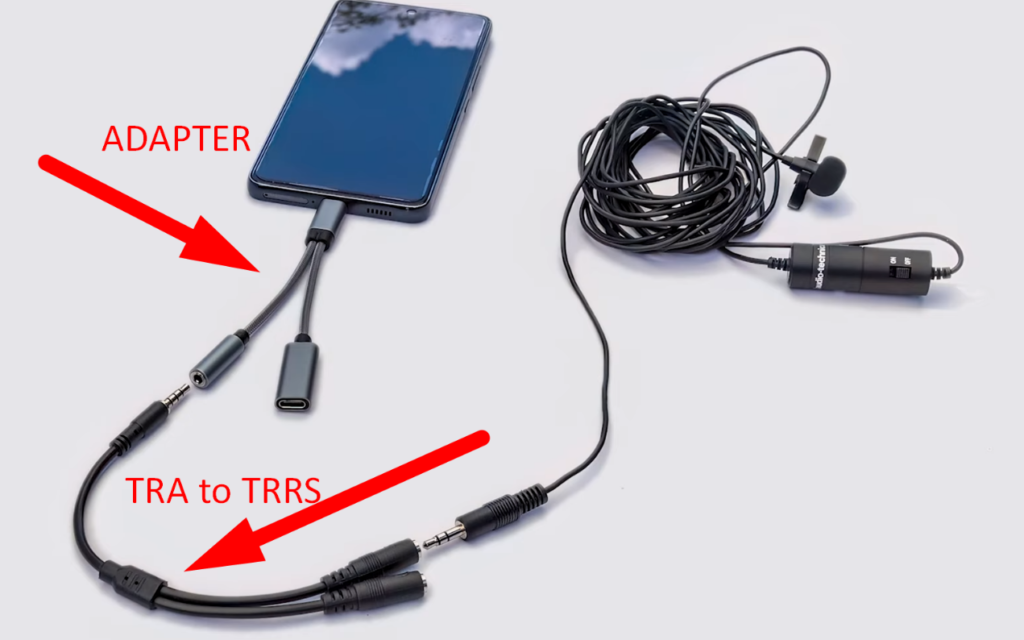
- First, plug the TRS jack into the “TRS to TRRS adapter.”
- Then, plug its end into the “TRRS to Lightning adapter” and connect it to the phone’s SGP port.
- Also, a TRRS Microphone, a “TRRS to Lightning,” and a 3.5mm audio jack adapter are used to make it compatible.
- USB-C Method
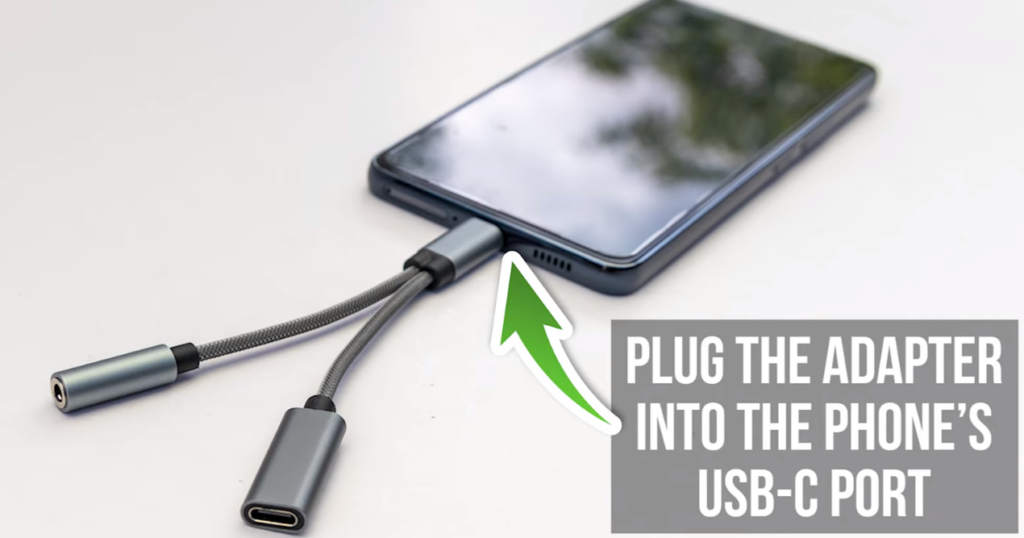
The newest iPhone and Android smartphones have a new USB-C connector feature, and an adapter is required for seamless connection. Therefore, a “USB-C to 3.5mm TRRS adapter” is needed to capture high-quality audio.
- Wireless Connectivity
To connect a wireless mini microphone, ensure the mic is charged, and the receiver is connected to the audio input. It brings the convenience and freedom to connect wirelessly for high-quality audio recordings. So, hereunder is the step-by-step guide for seamlessly combining the mic:
Step 1- Setting the Pairing Mode
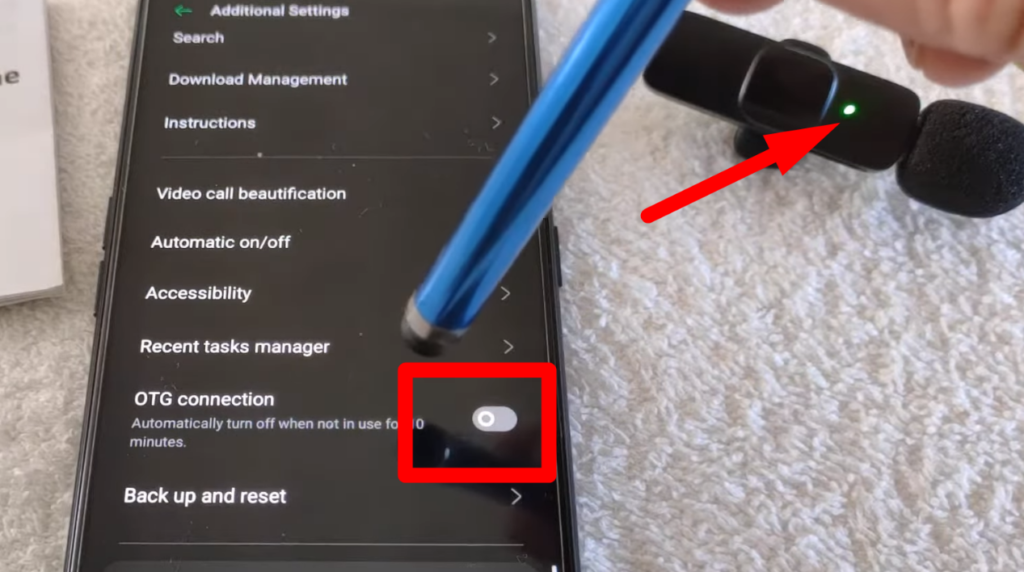
- First, switch on the mini wireless microphone by pressing the power button until the indicator light blinks.
- Enable the microphone’s pairing mode by pressing and holding the Bluetooth button. However, it varies with microphone models, allowing your phone to detect the mic.
Step 2- Connecting with Smartphone
- Go to your smartphone settings, open Bluetooth, and search for the available devices.
- Click on the mini wireless microphone, and it will start working seamlessly.
Adjusting the Audio Settings
After connecting, adjusting the microphone settings for optimal audio quality recordings is essential. So, follow the steps to make necessary adjustments to your needs and use.
- For iPhone:
Step 1- Open the Privacy
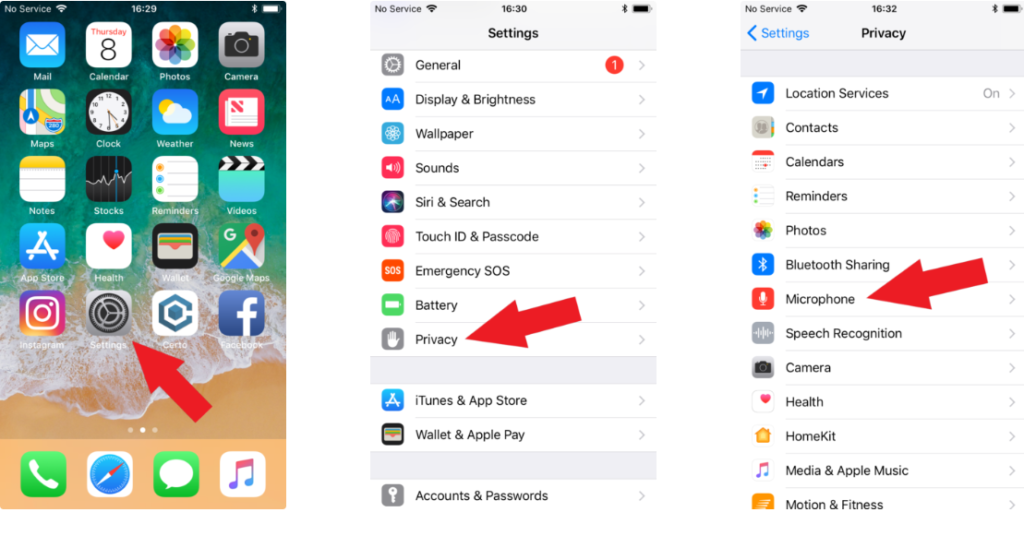
- From your smartphone screen, click on the Settings app.
- Then scroll down and click on “Privacy.”
Step 2 Enabling Microphone
- From the next popup window, click on “Microphone.”
- There will be a list of apps with access to your microphone. Ensure you select the “Enabled” button next to the app if you want the app to use your mic.
Note: If you cannot see and select the desired app, scroll down to the bottom and click “Enable all Permissions” to give access to all apps.
- For Android:
Step 1- Apps and Permissions
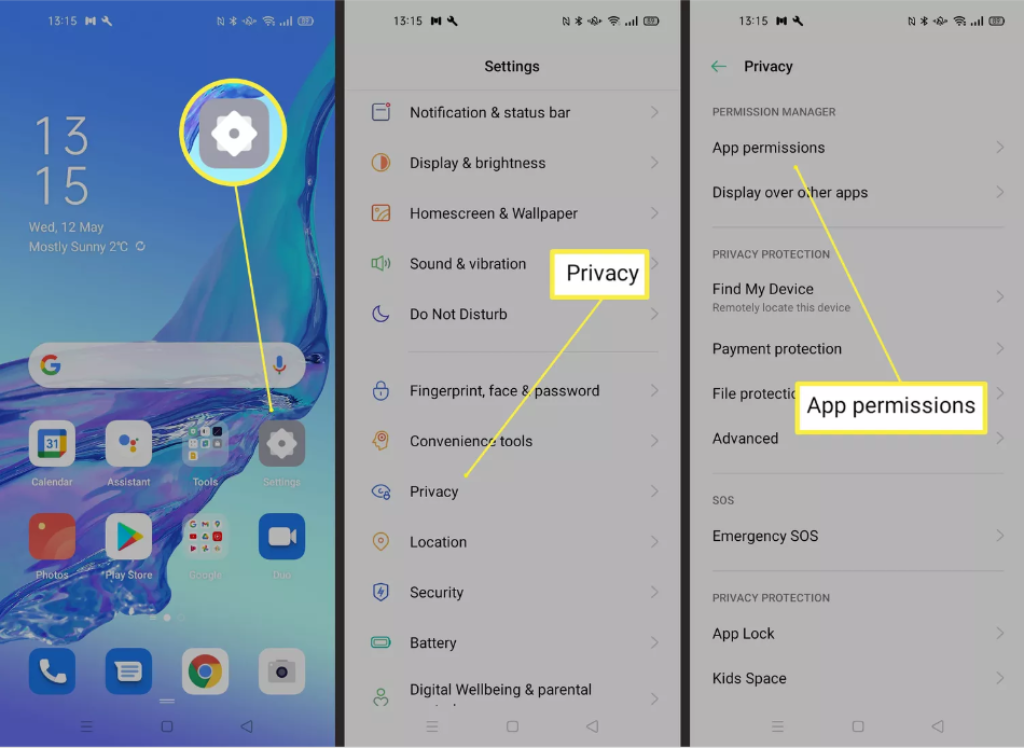
- Open the settings app from your Android and scroll down to click on “Apps and Permissions.”
Step 2- Enabling Microphone
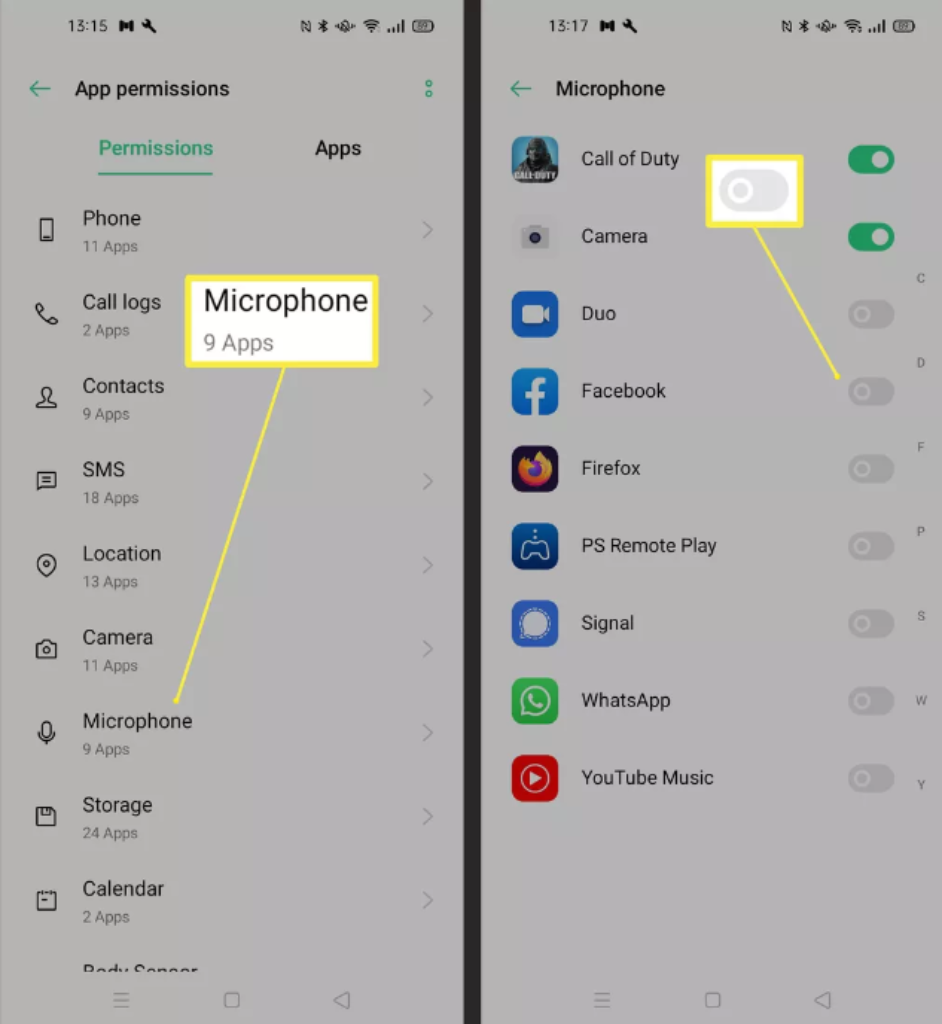
- Then click on the “Microphone,” and a list of allowed apps will be generated.
- Look for the desired app to check if it’s enabled.
After setting the microphone as a primary audio source, you can adjust the volume according to your preference. However, some of the standard mic settings include the following:
Microphone Directionality: With versatile directional patterns, you can select the suitable option depending on your recording environment.
Microphone Gain: It controls the sensitivity, and setting the gains high will result in distortions, or putting it low will provide an inadequate experience. Therefore, adjust the Gains according to the surroundings and desired volume level.
Frequency or Equalizer Settings: Understanding the equalizer or frequency response provides specific recording needs for clarity during noisy environments.
Testing the Mini Microphone
After adjusting the settings, recording a short test ensures that audio quality meets the expectations. Hereunder are step-by-step instructions for seamlessly registering a short clip to evaluate the mini microphone effectively.
Step 1- Selecting the Recording App
- First, ensure that the smartphone or mini microphone is charged correctly.
- Open preferred or built-in voice memo apps or software depending on your device preferences.
Step 2- Microphone Positioning
- Position the microphone according to the recording environment and keep it 6-12 inches away from the source for optimal clarity.
- Ensure the camera is pointed toward the source to avoid background noises or interference.
Step 3- Test the Audio Levels
- Check the audio levels, ensuring they’re not too high or too low to avoid distortions.
- Record a short speaking passage at a consistent volume to provide stable audio input.
Step 4- Monitoring of the Audio
- Playback the audio on your device by listening attentively to assess the microphones and clarity.
- Using headphones or a monitoring system provides real-time adjustments to position the microphone during live performance.
After evaluating the test recordings, you can improve the microphone adjustments to achieve high-quality audio. Also, the mini wireless microphones enhance the audio quality with noise-cancellation technology.
Troubleshooting Tips
Sometimes, audio distortion and connection problems adversely affect the quality after connecting the mini microphone. So, hereunder are the standard troubleshooting techniques that will help resolve the issues effectively.
- Connectivity Issues
Commonly, connectivity issues arise when a mini microphone fails to connect or pair with the receiver. Therefore, ensure the mic is firmly attached to the recording device, such as a headphone jack or lightning port.
Also, check for damages or debris that may interfere with setting the secure connection. It happens because, over time, dust or debris accumulates in the ports, preventing the standard connection.
- Poor Audio Quality
Placing the mic far away from the source or near the noise source will result in poor or distorted sound quality. To improve the audio quality, ensure it’s correctly positioned and not obstructed by objects. Also, adjusting the volume levels and maintaining a proper distance is crucial for optimal sound quality.
- Interference or Background Noises
Mini microphones with noise-cancellation technology are preferred to suppress unwanted noises and bring clarity. Additionally, moving to a quieter place or using bass traps’ acoustic treatments will help to record without interference.
- Setting Adjustments
The distortions or clipping, sometimes, are because of the improper microphone settings. So, ensure that the settings, such as Gains or Polar Patterns, are configured according to the recording environment.
- Battery
If the mini wireless microphone battery is shorter than expected, then it’s best to conserve it by enabling a power-saving feature from settings. Also, the wireless mic has a limited range, and it’s best to stay within the recommended range for quality recordings.
Usage Tips
A mini microphone can vastly enhance the audio quality experience, improving functionality and performance. Therefore, hereunder are some of the usage tips that will help in the audio quality of the mini mic:
- Positioning the Microphone
Position the microphone at an appropriate distance from the source to capture clear and distortion-free audio. Place the microphone at 6-12 inches from the source to avoid interference from the background noises.
- Attach Microphone Firmly
Depending on the type and design of the mini microphone, placing it firmly on the clothing or source will enhance the audio pickup. Also, ensure that the diaphragm (sensitive part) faces toward the source for maximum audio capture.
Because of the sensitivity, a stabilizer or tripod stand must minimize the shakes and enhance sound quality.
- Minimize Interference
Ensure that objects do not obstruct the mini microphones, or they may cause reflections or sound transmissions. Furthermore, using acoustic treatments such as foam panels or windscreens clarifies the audio by removing unwanted background noises.
- Monitoring the Audio Levels
First, check the moderate audio levels and adjust the microphone’s sensitivity to avoid distortion or background noises. Also, the mini microphone provides a real-time audio monitoring system to make necessary adjustments during live performance.
Mini Microphone: Rode SmartLav+ Lavalier Microphone
Rode SmartLav captures crisp, clear audio with an omnidirectional condenser capsule for versatile recording environments. The microphone is easy to use with a simple plug-and-play design, and no additional software is required.
Connecting to the Microphone
- The 3.5mm mini headphone jack can be connected directly to the smartphone.
- However, for iOS, it’s essential to use “Lightning or USB-C to 3.5mm adapter.”
Compatibility
The microphone is compatible with a versatile recording app and pairs seamlessly with the iOS Rec App. Also, the Rode Rec app provides a field recorder and enables you to edit and publish the recordings professionally.
Conclusion
Mini microphones open up the possibilities to bring clarity to your podcasts, interviews, or calls. Using a microphone on a phone can make a significant difference in capturing high-quality recordings precisely. However, selecting the mic according to the recording environment or adjusting with proper placements are crucial for the best recording.
With a lightweight and portable design, the mini microphone allows content creators to record quality audio. So, adding a mini microphone opens up a world of possibilities to bring creativity to your high-quality sound.
FAQs
How can I Connect a Mini Microphone to Your Smartphone?
Depending on the smartphone and microphone type, you can connect directly via the headphone jack or need an adapter. For a USB-C microphone with a 3.5mm phone, a 3.5mm to USB-C adapter is used. Then, plug the mic directly or with an adapter to your smartphone.
Select the microphone as the primary audio input source from settings and test with different apps. After adjusting the volume or sensitivity range, you can seamlessly connect the microphone to your smartphone.
What Apps Are Needed to Use a Mini Microphone on a Phone?
Sometimes, mini microphones work fine with phones’ phones and recording apps such as Voice Memos (iOS) or Voice Recorder (Android). However, some mics have a dedicated app offering additional features and customization. Besides this, different communication and video recording apps are needed, and permission is required to use these apps.
Can I Use a Mini Microphone on Both Android and iOS Devices?
Yes, the mini mic has a Type-C or lightning connector to connect directly to Android or iOS devices. However, with Lightning or USB-C to 3.5mm adapter, you can plug your microphone seamlessly into your smartphone.
How do you improve sound quality when using a mini microphone on a phone?
Besides good-quality microphones, positioning the microphone close to the source will minimize background noises. Record in a close environment or use the mic with noise cancellation technology. Using the windscreens and monitoring the audio levels will clarify sound recordings.
What Are the Best Mini Microphones for Smartphone Video Recording?
For vloggers and live streamers, selecting the best mini wireless microphones depends on specific needs, budget, and type of videos.
- Hollyland Lark 150: Provides high-quality vocals with versatile shooting equipment.
- SYNCO P2T: Portable streaming of podcasts and perfect for the semi-quiet area
- Sennheiser MKE 2: Dual diaphragm is ideal for theater, broadcasting, and film production.
- RODE SmartLav+: Best audio and video capturing microphone
How can I troubleshoot common issues when using a mini microphone with your phone?
Some common issues are poor audio quality, distortions, background noises, and compatibility. Position the camera toward the source to troubleshoot these issues and check if the mic is firmly connected. Also, ensure the recording is in a quiet environment or without interference, and analyze the mic for battery or compatible apps.
Can I Use a Mini Microphone for Live Streaming on My Phone?
Yes, mini microphones provide excellent audio quality during live streaming. However, configure the settings and test check before live streaming to ensure the microphone works seamlessly.
How to Use a Mini Microphone for Podcasting on a Smartphone?
After selecting a compatible microphone, connect it to your phone wirelessly, directly, or with an adapter. Then, like a recording app according to a smartphone, carefully set your recording environment to avoid interference.
After that, position the microphone toward the source and test record the microphone to check the audio levels. Once your setup is complete, start recording the podcasts clearly and consistently to ensure smooth sound recording.
What Are the Power Requirements for Using a Mini Microphone on a Phone?
The power requirements for wireless mini microphones vary and can be charged via USB cable. Wireless Lavalier microphones are battery-powered or phantom-powered and equipped with built-in preamplifiers.
Furthermore, the microphones with plug-in power capability use a power between 3-5V. However, with a 3.5mm plug, your microphone will draw the required energy from a connected source.
How to securely attach a mini microphone to your phone?
Microphones with clip-on designs can be firmly attached to the phone for optimal sound quality. Sometimes, mini microphones with shock mounts and tripod stands are designed to reduce shocks and resistance for maximum sound quality. For secure attachment, firmly attach the mic with adapters for smooth audio.
Are there any compatibility issues with specific phone models when using a mini microwave?
Yes, with technological improvements, compatibility issues exist between your mic and device. Also, compatibility issues arise with smartphones, port types, power, and adapter requirements.
How to clean and maintain your mini microphone for optimal performance?
You can gently clean the mic surface with a microfiber cloth or soft-bristled brush to remove the accumulated dust and debris. Furthermore, store it on a protected couch and avoid contacting extreme temperatures and humidity. Also, always check the battery before and after using the mic and use it according to the instructions.
What Are the Differences Between Wired and Wireless Mini Microphones for Phones?
The wired mini microphone is more reliable and provides a direct signal path for better audio quality. However, the mini wireless mic provides optimal sound within a specified range and brings freedom of movement. Also, wired mics have strong and stable connection stability, and pairing the wireless becomes troublesome sometimes.
Can I Use a Mini Microphone with a Phone Case On?
Yes, mini microphones can be used with a phone case, depending on the flexibility or case thickness and compatibility.
How to record stereo sound using mini microphones on a smartphone?
First, select the mini microphone designed for stereo recording and connect the mic directly or with an adapter. Select the compatible stereo recording app or stereo mode and adjust the settings according to the recording.
The stereo mini mic has a built-in battery, plug-in power, or phantom power requirements. Select a suitable positioning and recording environment for better audio quality. Also, the test recording is crucial to understanding and enhancing the quality of post-stereo audio.


![How to Use Mini Microphone with iPhone? [Quick Tips]](https://micwizard.com/wp-content/uploads/2024/03/image-21-336x220.png)
![How to Use a Mini Microphone from Temu [Step by Step]](https://micwizard.com/wp-content/uploads/2024/02/image-67-336x220.jpeg)
![How to Use Mini Microphone From Target? [Step by Step]](https://micwizard.com/wp-content/uploads/2024/02/image-55-336x220.jpeg)